Wednesday, July 20, 2016

Shades of Purple

Hello there my friends!
A new challenge is up and running at Double D
and this time it is being hosted by Team Darlene.
The theme is
'Shades of Purple'
which I just happen to know is Dar's favorite color!
She has put together the awesome tile board below to get your mojo going!


I have to admit, my card design came together for me
in the middle of one of my 'sleepless' nights..!


I used a very old color block stamp
that I stamped in 3 colors of purples,
then added a fussy cut butterfly to each.

The sentiment is another oldie,
one of my first stamps I had purchased from Unity Stamp.
Sometimes I like to use the bigger, bolder
sentiments to really make a statement.


I know the 3rd butterfly looks a little off center,
but believe me it is spot on
(that's because I moved it after I took the photos..lol)!!

I added 3 sequins to finish it off.
I know they look pink in the picture,'but they are really a lavender color.
So there you have it, my 'shades of purple'.

So pop on over to Double D Challenges
and see what the Design Teams have to inspire you.
There always is a fabulous prize being offered, just for joining in with us!

Entering the following challenges:
Word art Wednesday .... ATG
Simon Says Wednesday Challenge.... Things With Wings

Products Used:
Paper:  Kaisercraft Violet Crush (butterflies) SU Elegant Eggplant
Stamps:  Color block (unknown) Unity Becoming Butterfly
Inks:  Dew Drops Lulu Lavender, Grape Jelly, Sweet Plum

Tuesday, July 19, 2016

Happy Birthday Foxy

We are being
'SUPER SIZED'
Our assignment was to choose any file we wanted
but to super size it!


I chose the  Hey Foxy Card Set.
I made my fox as big as I could on my Cricut Explore
and he took up the entire length of my 12 x 12 card stock!

This adorable set also comes with a Santa hat, antlers and the
cute birthday hat which I chose.
There are also several sentiments in the set to choose from.  I used two SU round punches to punch my sentiment.
However it doesn't stop there as this set also
includes a  "Foxy'  word card!!


I added a few embellishments
and it seems  I have a thing for adding google eyes..lol!

Make sure and pop on over to The Cutting Cafe blog
on the 21st and you can see ALL the Designers
Super Sized projects in one place.


Oh and just for your information,
did you know that The Cutting Cafe Shop
will make your own custom stamp,
plus they carry their own line of stamps
and other paper crafting goodies!

I will be back this week with a couple projects using
new stamp sets from the Shop!

Entering the following challenges:
Craft-Dee Bowz .... ATG with a Handmade bow
Crafting From The Heart .... ATG
Use your stuff .... Dies cuts/or/Punches
Animal Friends .... Punch/Die


Sunday, July 17, 2016

The Christmas Skate

This is my post today on the


Happy Sunday Morning  to You!!
Diane with you today using another beautiful new stamp from our July release,
The Christmas Skate
I started by stamping the image with Memento Tuxedo Black ink.
I colored it in my various Copics.
Once colored, I cut it out with a Spellbinders ornament die.
I wanted to skates to overlap the front of the ornament
so I cut up around the skates then placed the ornament die
with the tip underneath the skates as shown.
Here is a front view
The Christmas Skate
and
The Christmas Skate
a back view.
I wanted the skates to look vintage and worn,
so I added Brushable Glue, then Ballerina Velvet glitter.
The Christmas Skate
I cut out another ornament from the same die set
on a piece of super adhesive sheets.
I embossed the sentiment in Silver Detail embossing powder,
then removed the backing from the
adhesive sheet and adhered  the fussy cut sentiment.
I added Bubblegum glitter to the rest of the ornament, then
popped it up on the front.
Two more tiny ornaments were cut for decoration
also using the same Bubblegum glitter.
I used a Glue Pen on the holly leaves adding Lady Luck glitter.
The same was done with the berries, but this time
adding Gypsy Red glitter.
The Christmas Skate
I finished by added a Pull Ribbon green and gold bow
Thank you for visiting with me today.
Happy creating!!

Entering the following challenges:
My Time To Craft .... Christmas In July (7-25)
Crafty Hazelnut's Christmas .... ATG (m)

Friday, July 15, 2016

Day At The Beach

New challenge starting up today at the 
Dies R Us blog and the theme is
Beach/Water.
Perfect, don't you think for July?


I have lots of beach dies and have made lots of beach cards.
I had to give this one a bit of thought
and ended up die cutting a circle from
then sponging Distress Inks Bermuda Bay and Crumb Cake on.
All the other dies I used were cut from various scrap papers
except for the
that was cut from a cover of one of my paper pads.


The beach fence I popped up in a few places, 
trying to make it look like the real thing.

Just a fun nautical card, one I think would make an 
excellent retirement card!

Make sure to visit at the
Dies R Us challenge blog 
and see all the lovely cards by the Design Team.

Entering the following challenges:
Simon Says Stamps .... Create A Scene (7-20)
Try It On Tuesdays .... Happy Holidays (7-18)
Words To Craft By .... Just Keep Swimming (7-31)


Thursday, July 14, 2016

Bounties of Fall

This is my post on the Tutti Designs blog today.
 I have to say I am LOVING these new dies,
I have a bunch to show you in the upcoming weeks.
My mind is already rolling with more ideas with this die.

Happy Thursday morning to you!
Diane with you today to share one of the awesome
new dies from the July release!

The die I have used today is Autumn Wheelbarrow.


I did a pretty basic card letting the die take stage so to speak.
After all, these dies are a perfect size for 'center stage'!


I layered my card, first with an olive green background.
then with a vanilla card stock piece that I embossed
with a pumpkin vine embossing folder.

I added a piece of scor-tape to the top,
then added the gingham scrap piece.


The die was cut twice first in green, then once again in an
orange cordinations paper that I carefully sanded.
I say carefully as this pretty die has so much detail.

A little 'tip' is to layer as I have. Just off setting the top layer
a tiny bit it just adds a bit of interest.
The entire piece was then popped up.


To finish I simply added a twine bow/button and
stamped a sentiment.


Make sure and check out all the great places to
visit the new Tutti Designs dies.

Thank you for visiting with me today.....
"I" will be here each and every Thursday!!
Come back tomorrow for more fabulous inspiration!

Happy creating!


Diane


Wednesday, July 13, 2016

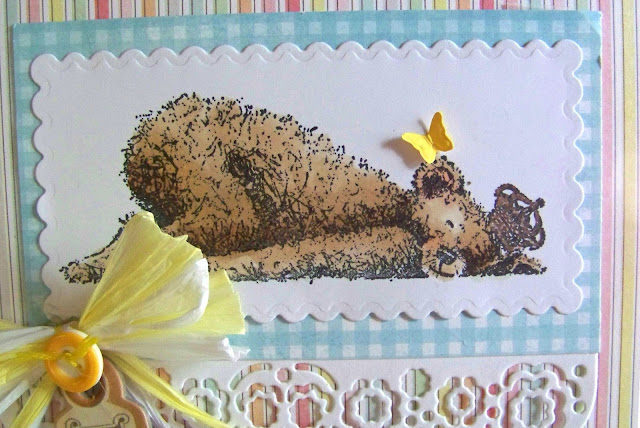
Shhhh Baby Sleeping

The Sisterhood of Crafters has a new and fun challenge for you!
The theme is 'animals' and is being hosted by Vickie.

This was a hard one for me only because of choosing 
'which' animal to use!
I have lots of new dog/cat stamps, dies and other images
I could of made dozens of them...lol.


In the end I chose a 'new to me' stamp
by Indigo Blue called 'Sleeping George'.

He was colored lightly with Copics
and his crown was sparkled with a glitter pen.


I added a tiny butterfly on his ear, 
as my stamp seemed to have a flaw on it,
it made a tiny dot of ink right above him.
I think with a razor I can maybe cut it off the stamp.
But, the butterfly was a good save I think.

The blue gingham paper was a scrap laying on my work table
from another project and the raffia ribbon
was packaging from a gift I received for Mother's Day.
It was also laying on my work table, but it seemed perfect for the card!

So now why don't 'you' pop on over to
The Sisterhood blog and see what my 'sistahs' have to inspire you with!

Entering the following challenges:
Pixie's Snippets Playground
30 Day Coloring challenge
this one

Products Used:
Stamp:  Indigo Blue Sleeping George
Dies: SB Rectangle Scallops, Precious Marieke Flower Border
Paper:  

Sunday, July 10, 2016

Deer Duo

This is my post at the
Sparkle N Sprinkle blog today.

Hi, Diane with you today with an easy to do
gatefold card.
Deer Duo
I started first by printing then coloring in the 
Once that was done I used a Memory Box Square Stitched die cut
Deer Duo
I added glue from a Quickie Glue pen to the antlers.
Deer Duo
Then quickly added Sparkle N Soft Sparkling Sands flocking
to give the antlers a bit of a 'velvet' look.
the deer noses.
Deer Duo
I set them aside to dry (overnight) and started working on the gatefold card.
The red card stock was cut 8 1/2 x 5 1/2, then scored at
2 1/8" from either side.
The 2 white panels were cut 5 1/4 x 1 7/8.
I used a bone folder to get good creases in the base of the card.
Deer Duo
A Memory Box snowflake stencil was used
Sparkling Snow glitter was them sprinkled on.
These were also set aside to dry (overnight)
then I used the Glitter Brush to brush off all excess glitter
Deer Duo
Once dry each panel was adhered to the front of the
gatefold card.
Deer Duo
The sentiment was printed and adhered inside of the card.
Deer Duo
I added a tiny velcro dot to the left side of the image to hold the card flat for mailing.
Deer Duo
This card was very easy to make and also an easy mailer!
Thank you for visiting with me today!

Entering the following challenges:
Dragonfly Journeys .... July Jingle Bells
Christmas Cards All Year Round .... ATG (M)
Crafty Hazelnut's Christmas Challenge Extra .... ATG Christmas (m)


Diane Hover
www.nelliesnest.blogspot.com
Stamps:  Deer Duo Digi 797
Glitter:  Sparkling Snow G1003
Sparkle N Soft Flocking Sparkling Sands SS118
Nuvo Crystal Drops Glitter Drops Golden Sunset 757N
Memory Box Stencil Winter Large Snowflakes
Memory Box Stitched Squares Die
Dreamweaver Embossing Paste DR-DEP