Thursday, September 11, 2014

Halloween Spoolies

I have been getting myself "geared up" for Halloween and Fall
maybe not in that order, but it seems it is here and gone before you know it!! 


For my weekly Crafty Secrets project I was in the Halloween mood.....
Last year I made a few of these "Halloween Spoolies" and I am adding more
to my collection this year, but these are more vintage and my new favorites!!


I can't seem to get enough of this CD!!


I printed digital paper and glued it on my wooden spools.....
I printed my little characters, hand cut them (easy peasy), 
glued them on a chenille stem I had spiraled....
added a bit of glitter (Stickles).....
some trim I had on hand and I was done...now how easy is that!!!!


Don't forget
Crafty Secrets is having a "Blow Out" sale......
my goodness, you get approx $70 to $80 worth of project in the mail
for $19.95 plus shipping....
you will see me using some  of these projects in the coming weeks!!
Check it out below!!

Entering the following challenges:
Diva's by Design .... Anything Goes
and
Through The Craft Room Door ....Anything Goes
and
All Crafts Challenge ....  Anything But A Card
and
Not Just Cards ....Anything Goes

I want to share some news.  As many of you know owner Sandy Redburn wants to go completely digital and has all her printed stock on sale 50% off but she has also just put together 6 amazing theme packs for $19.95  at over 70% off the original retail price! They include: Summer, Girlfriends, Christmas, Little Boy, Little Girl and Halloween.  


  You will find all of these amazing blowout packs on the front page of our onlineCraftyVintageGirl.com Store.  Don't miss out on these and they would also make amazing Christmas gifts for your crafty friends and family members!

Wednesday, September 10, 2014

A Friend Will Always Be There

Hello My Friends...
This week at The Sisterhood of Crafters Micki is our hostess
and she has asked us to create a single layer card....
I played a bit with my inks for this one and made a super easy card to mail!!


I started with stamping in Versamark and using a clear EB powder, then
sponging on my TH Distressed Shaded Lilac ink and stamping randomly in the same ink.
I saw this inspiration on Pinterest and thought I would give it a try.

Next I used TH Distressed Dusty Concord and stamped a few more times......
The flower stamp I used is  from SU Garden Silhouettes
and the sentiment is from Precious Remembrance Shop...
I have to admit I am not exactly in love with my placement of all the flowers...
but I decided to go with it anyhow, beauty is in the eye of the beholder I guess..lol!!


I invite YOU to join us with your single layer card and hop on over to 

"The Sisterhood" and see what the DT has to inspire you to join us!!

Tuesday, September 9, 2014

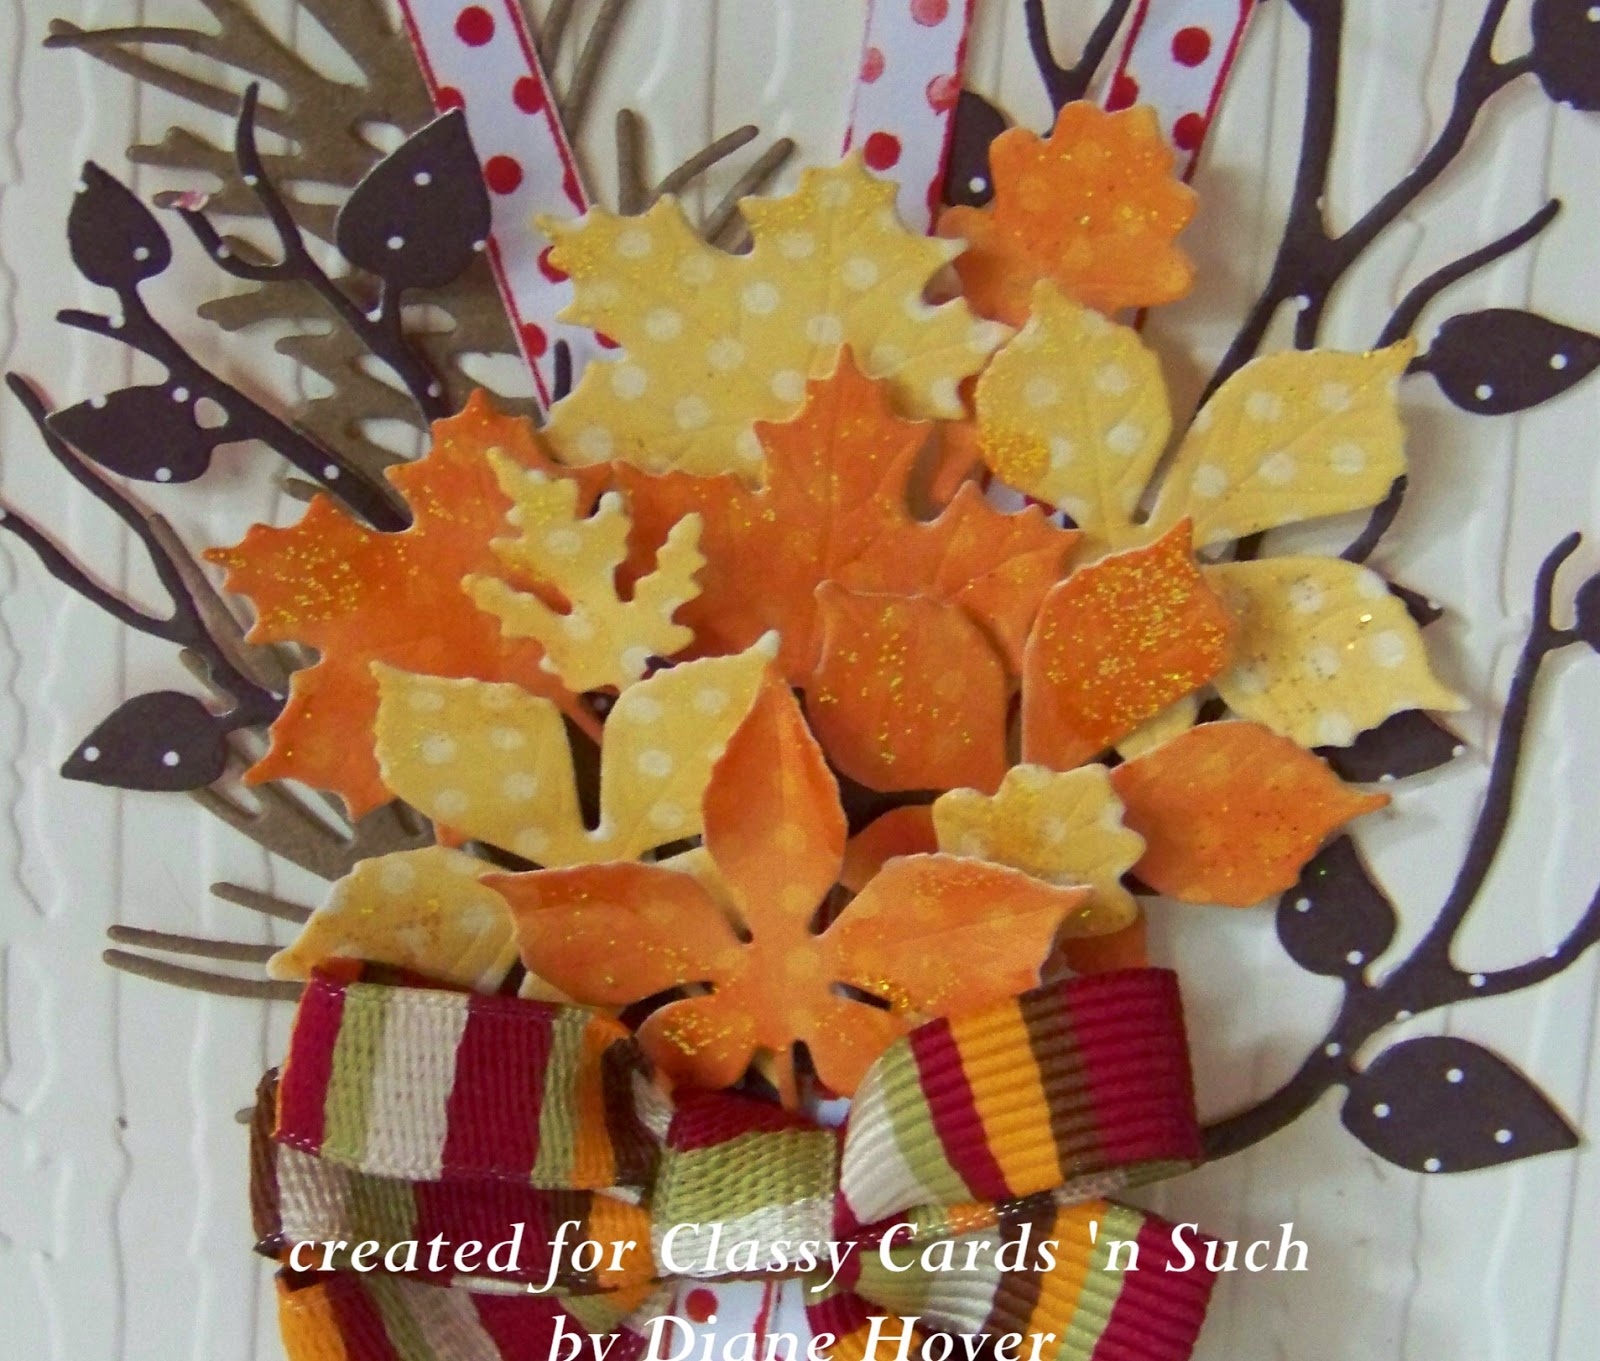
Fall Leaf Spray

Here is my post for our weekly challenge at 
I hope YOU will join us!!!
Make sure you sign up for the newsletter....
you won't want to miss out on all the specials...
for example, last week it was FREE shipping!!

Hello Classy Friends!!!
Here it is September already, can you believe it?
Labor Day is over, the kids are back in school
and we are all thinking about "Fall" including the Design Team
at Classy Cards 'n Such....

The challenge this week is all about "Stripes~Dots~Chevrons"
in all the pretty colors shown in the inspiration photo below.


 I have been thinking of getting my Fall decorations out and normally
one of the first places I start is with my back door...
usually hanging a pretty "fall leaf spray" on it
which is where my card idea came from and using the inspiration photo.


I started with the cutest Impression Obsession Dot Straw
which I stamped three times and then cut out.

Adding next to my fall spray is the Impression Obsession Pine Branch
dies and shhh  don't tell anyone, but I snipped those poor birdies right off!!!


To finish the fall spray, I cut various small leaves from the 

I added a bit of Stickles to each leaf for some shimmer.
Then added my Maya Ribbon bow and a sentiment..


Won't YOU join us this week for our Stripes, Dots Chevrons challenge??
We would love to see your project!!!

Entering the following challenges:
Artistic Stamper .... Autumn Colors
and 
Bearly Mine .... Autumnal colors
and
Make My Monday .... Indian Summer
and 
Melonheadz Friends .... Two or More Dies


Monday, September 8, 2014

Owl Love You Forever

Good Monday Morning to you
It's time for a new challenge at "The Shabby Tea Room"
with our this weeks hostess Lenet and she has chosen
the theme "Birds of a Feather Flock Together"
along with the inspiration photo below and she asks
that we at least of the colors!


                                     Our sponsor this week is "The Cutting Cafe"
and I chose to use their adorable "Fun With Owls" set


The cute little owls are a "digital stamp" which I lightly colored with Copics
then cut out with a Spellbinders Devine Eleoquence  die.
The papers I used are all from Fancy Pants and I stitched around the edges...
I love how stitching looks, don't you?


I added a Spellbinders/JustRite Buntings and Banner die across the top
and a bit of SU ruffled ribbon across the bottom
and finished the entire thing with sheer ribbon and a few "do-dads"!!

Starting Sept 15th, The Shabby Tea Room is going to go "bi-weekly"
with challenges being on the 1st and 3rd Monday of each month....
we will be having "TWO" sponsors each challenge....

Now it's YOUR turn...head on over to "The Shabby Tea Room" blog
and see what the other Shabby Girls have to inspire you...
and while thee, why not join in with us...
we always have fab prizes from our sponsors!!!

Entering in the following challenges:
Paper Sweeties .... Pretty Pumpkins
and
Crafts Galore Encore .... Make A Card
and
All Sorts .... Pretty In Pink
and
Craft-Dee Bowz ....anything Goes With a Handmade Bow

Saturday, September 6, 2014

So Silk Fair Blue Crisscross Card

This is my post on Classy Cards 'n Such today....
thanks for looking!!!

Hello Classy Friends!!
Diane here with you today.


I decided I need to make a few more "fancy cards"
and chose the crisscross card for today.
I know you have seen these cards before, but it has been a long while
that I have done one and wanted to "showcase" my new
and thought this was the perfect card to do it!

I used the gorgeous "So Silk Fair Blue" paper for the front panels
and LOVE how pretty it turned out!
Lots of shimmery goodness in this paper!!


I added a wrap around sheer ribbon and a bow to the front
along with Impression Obsession Flowers 


The inside has a "pull out" panel as shown..
cutting two in the So Silk Fair Blue and one in Bluebell Stardream Metallic papers.

After stamping my sentiment from Our Daily Bread Ornate Framed Sentiments,
I cut it out using Spellbinders Decorative Labels Eight, using the smallest die in the set

I finished up with a few Light Blue Pearls for my flower centers
and Baby White Pearls for the inside panel!

Don't forget we have a weekly challenge.
We would love to see YOUR creation!!!

Wednesday, September 3, 2014

Autumn Harmony

This is my post at Classy Cards 'n Such today....
we have a great challenge going on and an even greater prize
to the challenge winner...join in with us!!!!

Hello Classy Friends!!
Diane here with you today with my project for
Our new challenge this week
Which  is Trees and/or Foliage and let the photo inspire you!


I went with a much larger card then I normally do,
a 5 1/2 x 5 1/2 square.


My background paper is from the beautiful  6 x 6 pad KaiserCraft "On This Day".
The paper is actually tiny polka dots, but my camera would not
pick them up, no way, no how!
Let's just say next year I am springing for a new camera!


I stamped Stacy Stamps "The Woods" with Versamark twice 
and heat embossed with Sparkle 'n Sprinkle Black Fine Detail Embossing Powder.

Next I used a piece of scrap and randomly "painted" different colors of 
Twinking H2Os from the Autumn Brilliance and Think Pink sets as shown.
I used the smallest leaves from Impression Obsession Leaf Cluster to cut out the various colors.


After the leaves were cut, I glued them here and there on the trees..

 The sentiment is from the Impression Obsession Harmony In Autumn set

The card was finished with Amber Rhinestones.

I invite "you" to get inspired from our Design Team and inspiration photo
and join in the challenge with us!!

Entering in the following challenges:
Word Art Wednesday .... Anything Goes
and
Wonderful Wednesday challenge .... Anything Goes
and 
Artistic Stamper .... Autumn Colors
and
Bearly Mine .... Autumnal Color Challange

Monday, September 1, 2014

Crafty Secrets September Linky Party "Time For Halloween"

Hello Friends....
My goodness, can you believe I have now been a designer
an entire month at "Crafty Secrets"...
It has been so much fun, but the month of August has certainly flown by!!

This month our theme for the "September Linky Party is"Fall & Halloween"
The challenge starts today and goes until Sept 14th....
The random winner of the challenge receives a $50 gift to the store
and ALL entrants get one $6 store coupon to use on anything!!

We also have a lovely "guest designer" with us this month
 "Glenda Brooks", make sure and visit her blog and see her wonderful creation!!


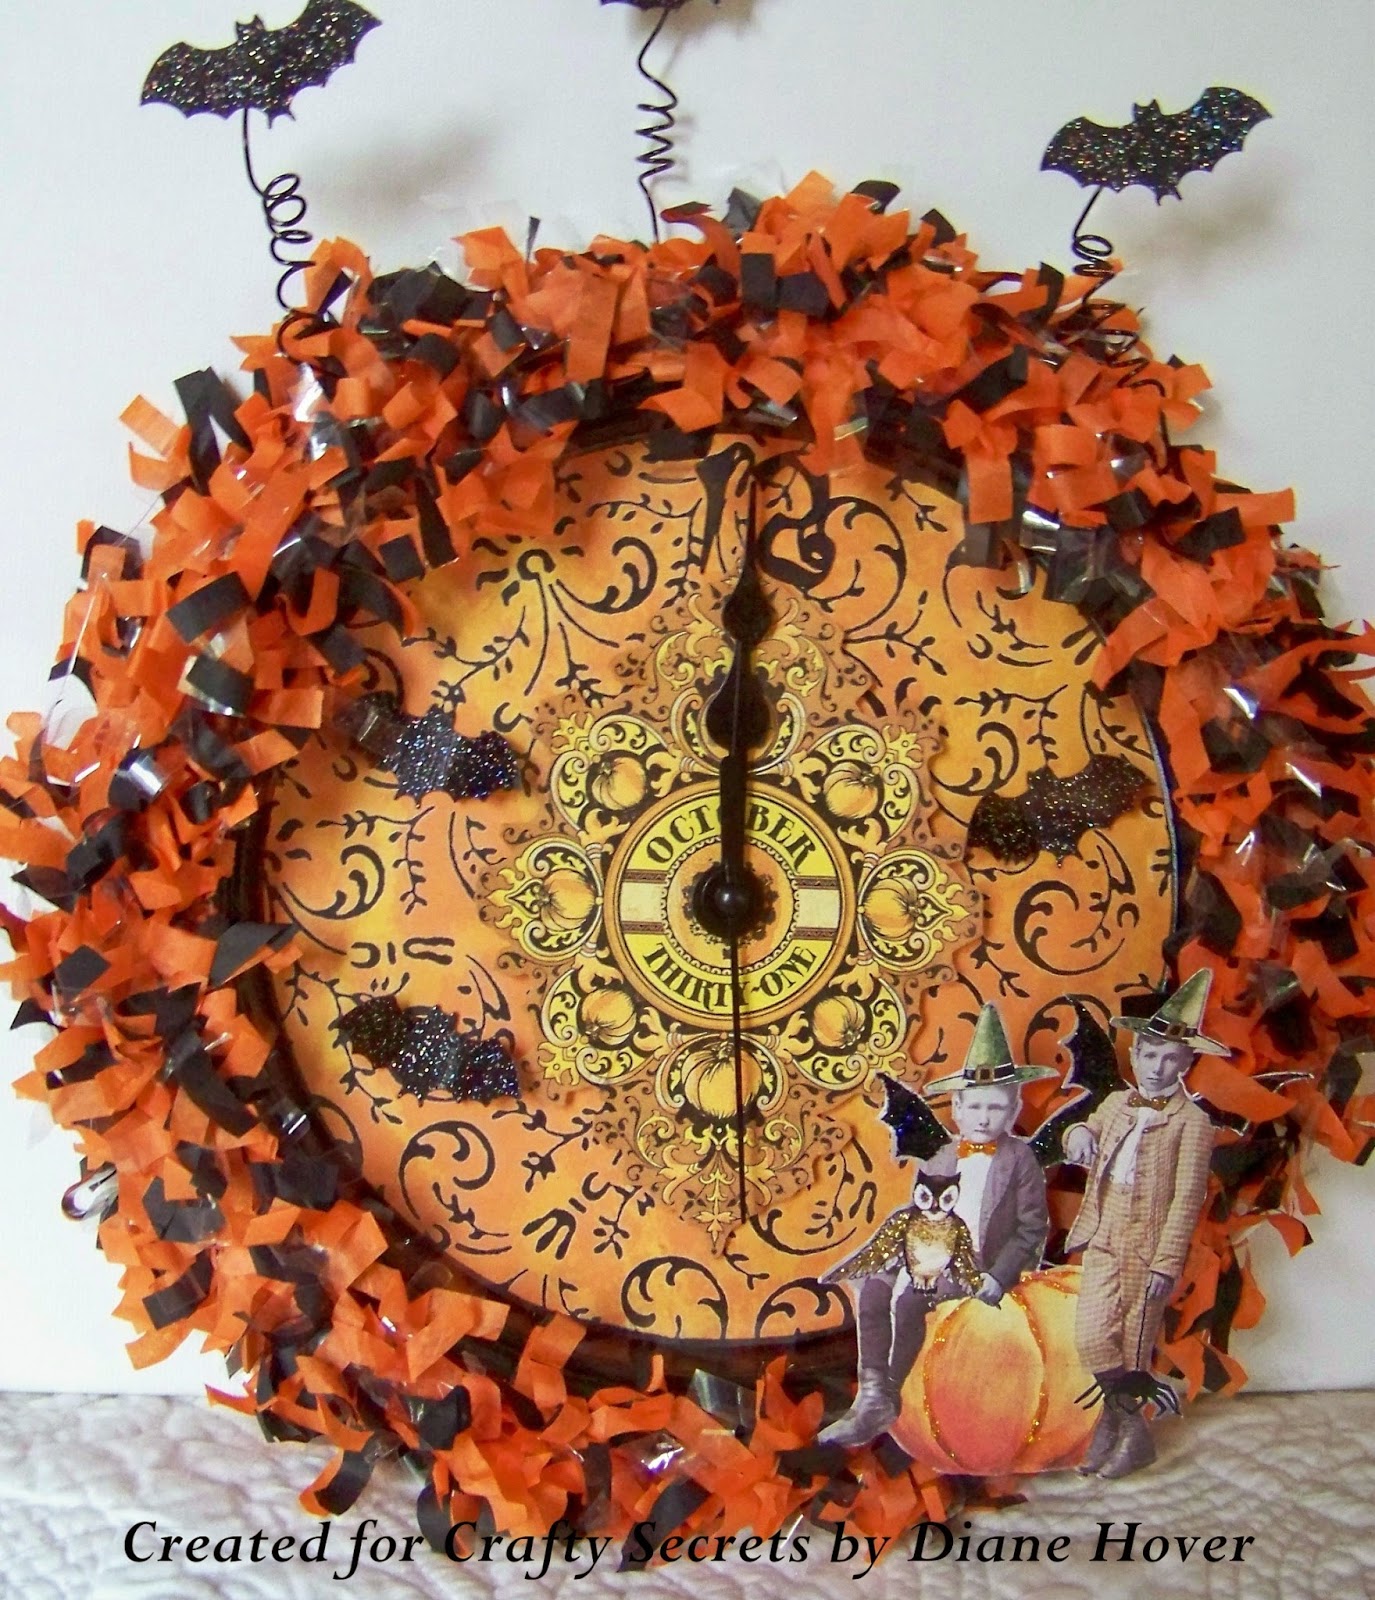
For my project I went with the "Halloween" theme and made a 
"Time For Halloween" clock!


I purchased this clock for $3.97 at Walmart..
On the back are 6 Philips head screws...
I took the screws out and the front face of the clock comes off....
and to my surprise the face is glass!!
I also removed the clock hands.


for all of my Halloween papers and figures...
I had a hard time choosing, as this CD is full of wonderful papers and images!!
The bats you see were from a punch....


Using the clock glass face as a guide, I traced a circle on my 
Crafty Secrets printed digital paper, cut it out and glued it down.
A "tip" is to run a black marker around the inside of the clock
along the edge to cover any of the white clock face underneath
that might still be showing!
 The October 31 was then added to the clock center and popped up for a more 3D look.
I decided to glue my hands down as I wanted them to stay at the midnight hour


Three glittered bats were also added to the inside..
The glass was placed back on and then the cover and it was once again screwed in place...
Very easy to do.


I wanted a more vintage look, so I printed and cut out my figures and added glitter
to various spots of each figure.

I had on hand some tissue paper garland I had purchased from Ebay and very quickly
hot glued it around the front edge.
You could also make your own by layering tissue paper, sewing down the middle and
cutting to just the stitching line on both side.  There are also special scissors that will do the
cutting for you if you prefer!


I attached my cute little vintage figures to the tissue garland
and 3 glitter bats that I had  mounted onto a spiraled craft wire.


This was a very inexpensive and fast Halloween project...
I hope you have enjoyed it enough to try one of your own

My "Tip" is to make sure you have the clock "hanging piece" at the very top
of your clock, right where the midnight hour would be. (ask me how I know this..lol)

Now, head on over to the "Crafty Secrets" blog and see what my teammates
have created...OMGoodness,...wait until you see all the wonderful projects....
Here are the direct links to their blogs:


Before you go, ...Crafty Secrets is going entirely digital and has amazing
deals going on for HUGE packets of non digital projects, stamps, papers, stickers, etc....


go and take a peek!!  You can read about the HUGE Blow Out sale HERE

and here is a sample of the Halloween and Autumn sale packet with the link HERE

Entering the following challenges:
All Crafts Challenge .... Anything but a card
and
Left of Center .... Alter It