Wednesday, November 30, 2016

Sparkle N Sprinkle December Reveal

Welcome to Sparkle N Sprinkle's
 December 1 New Reveal Blog Hop!

We have six new stamp sets to share with you today.  These new sets are 20% off until the 3rd of the month.  So once you finish the blog hop, head on over to the store and start shopping.  All of the new sets are available on cling mounted rubber or as a digital image.  


The sets are:


Build A Flower 811  (digi version DIGI811)
  Will Ewe Be Mine 813  (digi version DIGI813)
   Light Up My Life 814  (digi version DIGI814)
Rustic Flowers-Snapdragons 816  (digi version DIGI816)
Spring Bunny 819  (digi version DIGI819)
Build A Wreath (Digi Only)  DIGI3128B


On Dec 3rd, ONE GRAND PRIZE WINNER will be selected from the comments left on the Designers' blogs listed below. Please leave a comment with each Designer in order to be eligible for the Grand Prize.  You never know who the Mystery Designer will be that has the winning comment.

The Grand Prize Winner, which will be announced on the SNS Facebook page and on the SNS Blog, will receive ALL of the new stamp sets released this month (or the digi versions, if preferred).


The Blog Hop order this month is:

Eret
Chris
Shona
Belinda
Jess
Anne
Diane
Donna


(*Tip: if you have difficulty with a particular link, try clicking on the Designer's blog title to send you to their Home page.)


We hope you enjoy the New Reveal Blog Hop as much as we do.  Thanks for joining us and remember to comment on each of the Designers' blogs to be eligible for the Grand Prize.  
 Wonder who the Mystery Host will be this month????


The Sparkle N Sprinkle Creative Challenge also begins today.  There are lots of prizes and recognition badges.  Come check out how you can become a SNS Featured Artist as well.  The theme is always Anything Goes using Loose Glitter, Embossing Powder, and/or Flock.


Have you checked out the SNS YouTube Channel featuring Demo Donna?  If not, then you are in for a real treat.  Subscribe today to get all the latest Demo Donna tips and techniques!


Here is my project using the new stamp set
Build A Flower.


I first started by making my background,
I die cut Spellbinders Radiant Rectangles from white
card stock, then adhered it to Super Adhesive Sheets.
Cloud Nine Velvet glitter was then sprinkled on,
giving a gorgeous sparkle to the die cut and outer edges.

The flower pot was first stamped with Coffee embossing powder.


Then it was coated with Nuvo Large Glue Pen,
I let this set a few minutes, allowing the glue to get nice and tacky.


Now for the  fun part!


The excess was brushed away using Mini Blender Brush set.
Giving the flower pot a nice copper sheen.


Next, I stamped each size flower using Versamark,
then sprinkled with  Polka Dot embossing powder.
Each flower was then fussy cut out.
I slightly bent the petals up and using 3D Foam Squares,
the smaller flower was popped up, slightly off the larger flower.
The flower petals were stamped, colored with copics,
Parisian Mist glitter added to the veins, then fussy cut out.
A tiny little lady bug brad was added to the pot to finish!


Make sure and leave a comment on each of the DT blogs for YOUR
chance to win the entire release!.
Next on the hop is Donna.

Tuesday, November 29, 2016

Dear Santa Package


No black Friday shopping for me, how about you?
We were out of town for Thanksgiving
and had some fun at a casino (which we rarely go),
watched the Notre Dame game there,
met a few people we talked to,
and just had a very lazy weekend.
Well lazy if you don't count that I cooked 
Thanksgiving dinner for two and the hubs had a tree to cut up
(this is what met us when we arrived at the lake house).


On another note I have a funny/cute card to share today.
I used the digital version of the new 


I decided to make her background look like a package
by first embossing with a Sizzix Decor Dots EB folder.
I ran 1/2" Tear-ific Tape up the center and across each side,
then coated it with Lady Luck glitter for the  ribbon.


 I colored the image with Copics, then fussy cut her out
(I meant to go back and trim more off around her hair
and a few other places, but obviously I forgot)!

I used the  Lady Luck glitter once again,
this time on hr shoes, Golden Wheat glitter for the scroll
Cloud Nine Velvet glitter for the fur trim
and Blue Haze Velvet  glitter for her hair.
All the glitters were applied Nuvo Glue Pen Small.

Thanks for visiting with me today!

Wednesday, November 23, 2016

Pearly Bells

The challenge this week at
'Pearls'
and being hosted by our 'sistah'  Agata.


I chose to make a Christmas card
being Christmas is just right around the corner it seems.

I cut a piece of white card stock
then stamped it with gold metallic ink.

I pulled an already die cut pine branch out
and adhered it over the gold splatters.,
then added red pearls for berries.


Lastly, I cut 3 bells from various scrap pieces,
popped them up over the pine branch,
and added pearls to each.

Now make sure to pop on over to 
The Sisterhood challenge blog
and see what my 'sistah's have been up to
using pearls of their own!

Oh, and just for your information,
this is our last challenge for 2016
to give the 'sistah's a holiday break.
We will be back in January all rested up and ready to go.
See you then!!

Entering the following challenges:
Simon Says Wed Challenge .... To Die For

Products used:
Stamps:  SU Gorgeous Grunge
Ink:  Gold Metallic
Dies:  SB Lattice Ornaments, Die-Namics Winter Branch
Other:  Pearls, Card stock red/white, Scraps

Tuesday, November 22, 2016

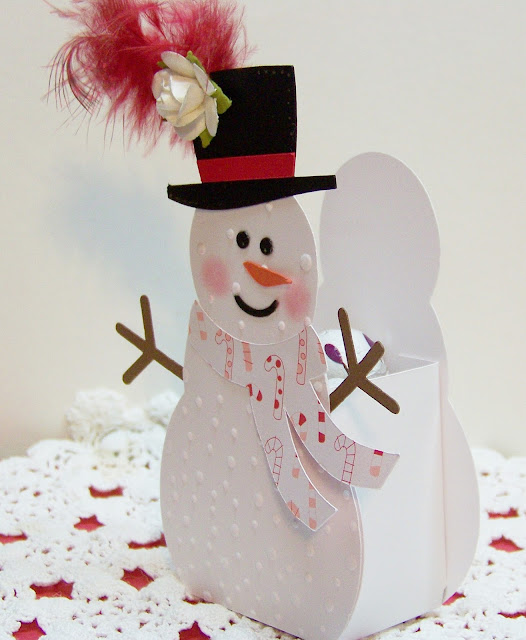
Snowman Treat Box

I have the cutest little snowman (or should I say snow-lady)
treat box to show you today!
This cute little lady whipped up so fast
using my Cricut and the cut file from
that I could make a few more of these real quick
for my dinner table as party favors!


The entire team has wonderful projects to share
and all very different,
as this week our assignments were a
'free for all'.


I choose this snowman treat box
as it just seemed so perfect for as cold as it here in Michigan
(they don't call us the winter wonderland for 'nuthin'..lol!


I bought little snowballs from Wal-mart
to fill my container
(and ate a few in the process).
My entire little snowman was made entirely from
my scrap bags of papers.
The file contains (as all her files do)
a PDF version if you don't own a Cricut or
another cut machine.


Take a peak over on The Cutting Cafe blog,
be sure and leave a comment for YOUR chance
to win any 3 cut files of your choice!

one last thing...did you know
The Cutting Cafe has the cutest online shop
for papers, 
their own line of stamps and other fun things?
Go and take a look around
as you will be pleasantly surprised!!
Entering the following challenges:
A Snowflakes Promise .... ATG (11/27)
The Crazy Challenge .... Getting Ready For Christmas (12/3)
Crafty Hazelnuts Christmas Challenge
Inkspirational .... Chill

Sunday, November 20, 2016

Winter Birdhouse

This is my post today on the

I have a 'sparkle-y' card to share with you today,
using the new stamp set Winter Birdhouse.

Winter Bird House
I started by laying my 8 1/2" x 11" card stock
across my scor-board with the 11" across the top.
Scor at 3 1/8" and again at 8 5/8".
Trim card length to be 5 3/8" long.

Winter Bird House

It should look something like this.

Winter Bird House C

I stamped the image with Memento Tuxedo Black ink,
then colored with Copics.
The panel was then adhered to the left side of the card
sprinkled with Fire Engine Red glitter
and then using my 'finger' tool,
burnished in.

Winter Birdhouse

For the left side of the card,
I cut a panel to fit,
then embossed with a Cuttlebug embossing snowflake folder.

Winter Bird House

Fire Engine Red glitter was added to the bird's scarf and Santa hat.
Sparkle N Soft Sapphire Silk was added to the bird tail and wings.
The glitters were applied with Nuvo SM Glue Pen.

Winter Bird House F

All the 'snow fluff' you see was created using
Nuvo Glimmer Paste Moonstone.
I applied it quite thick to resemble snow.
I also added it to a few of the snowflakes.
You can just see a hint of the inside sentiment which is from
the set Eskimo Kisses.

Winter Bird House E

I hope you enjoyed my card today and
thank you for visiting with me!

Entering the following challenges:
Crimbo Crackers .... ATG

Friday, November 18, 2016

Fancy Folds

The Fussy and Fancy challenge 
is being hosted by our lovely and talented Annie
and she has chosen the theme
A Different Fold/Shape.

Our sponsor is Wild Orchard Crafts.


I have an entire notebook of 'fancy folds, but do you think I could locate it?
Not to be....so I went to my favorite place for inspiration
'Pinterest'
and found this
'Circle Side Step' card Tutorial HERE.
I didn't post the tutorial here because number one
it's not my tutorial
and
number two
she has a wonderful and easy picture  tutorial to follow.


I cut a 6 1/2" circle on the Cricut Explore
making things pretty simple
then just followed the directions from there.

I cut a second 6 1/4" circle to use as my background.
I simply cut it apart to fit each piece.
The back of the card is covered as well.

I die cut a doily and a wreath (twice)
for my center 'attraction'.
All of my papers used are 'snippets' from my
scrap bags!

Tiny Roses were added along with a few holly leaves and berries.
the berries were die cut using red glitter paper snippets.

I added a doe and fawn and a few pine trees to finish.


It was a fun challenge, one that made me 
'think outside the box' as they say, 
pushing me to get a bit more creative.

Head on over to Fussy and Fancy and see all the 
beautiful creations the design team has to offer!

Entering the following challenges:
Pixies Snippets Playground .... Snippets
Crafty Hazelnuts Christmas Extra ... Patterned Paper


Products Used:
Stamps:  SU  Joyous Celebrations
Dies:  Cheery Lynn Designs French Pastry Doily,
          Impression Obsession Deer, Twig Wreath Set
          IO Pines Trees
Designer Paper:  SU
Ribbon:  RRR


Thursday, November 17, 2016

Garden Background

I have a 'free' day on the blog today
and told myself that with each free day
I would post a Christmas card.
Didn't happen..lol!
Instead I have a card I did as the in-store designer for card samples for
I love, love these intricate dies and how pretty they are.
I am working on the new release right now
(which is why I didn't have time to post a Christmas card).
You might see the new dies in-store next week
and WOW, they are beauties,
you won't want to miss them (just sayin')!


This card has 3 layers on the card stock base.
I love the all over design, making for a
quick and easy, but beautiful card.
I finished it with a ribbon/bow using ribbon from
the ribbon club I belong to at Really Reasonable Ribbon.,
a flower and a few gems.

Entering in the following challenges:
Mod Squad ...Ribbons 

Wednesday, November 16, 2016

Traditional Christmas

With all the new color schemes available for Christmas
some folks just like the traditional look
and that is what our challenge at Double D is:
'Traditional Christmas'
being hosted by Team Darlene
and using the mood board below for inspiration


Well, I have to admit, I had several ideas in mind for this,
but being a 'last minute~by the seat of my pants'
type of girl, I didn't do a thing I had planned..lol!


I used an awesome stamp from Impression Obsession
that I bought last year with a gift certificate I won from an IO challenge.

The name of the stamp is Santa Horses.
I stamped it with Ancient Page Chocolate Ink Dye pad,
colored the hats with Copics and hit the fur parts with
Clear Star Gelly Roll pen.


I think this picture shows the sparkle well.
The holly is Elizabeth Craft Designs
peel off stickers.  
They were applied to a sticky back paper, glitter added, then colored on top of the glitter with copics.

So grab some of your Christmas stamps and/or dies and join in all
the Double D Traditional Christmas fun.....
nothing better then a red~green~white Christmas!

Entering the following challenges:
Simon Says Wed. .... Christmas Critters
Allsorts .... Feature A Creature (x)
A Snowflakes Promise ...ATG (11/28)
Holly Jolly Christmas ...Ribbon/Lace (11/27)
30 Day Coloring Challenge
challenge_graphic-nov16_16x24

Tuesday, November 15, 2016

Tags Challenge at Dies R Us

Today begins a new challenge at Dies R Us
and it is an EASY one,
we are asking you to make a tag...how fun is that?
I love making my own tags,
just seems so much more personal 
as long as I don't have to make dozens and dozens of them..lol!


I made my tag above using all of the dies I have linked below.

I started by cutting a Memory Box ornament base 
of a glossy snippet of paper I had.
(good use of it I think)
I embossed it with a snowfall EB Folder
(gee, I wish this were still available, as every  time I use it you all want it)

Next I die cut the Dee's small snow covered tree.
This die is pretty neat one as it has FIVE stacked layers,
making it a very 3D tree.
It was cut from a green metallic card stock.

A small deer was die cut with Memory Box Deer Trio...
obviously from the name, this die is a 3 piece set
of which I only used one

I used a cute little Joy word die cut from Elizabeth Craft Designs
and a tiny bow to finish.

I did add a little faux metal 'topper ' to my ornament
cut from another die that is no longer available.

So pop on over to the Dies R Us challenge blog and show us your tags.
You could win a gift certificate to the store!!

Entering the following challenges:
Card Mania ...Tag You're It (m)