Tuesday, July 31, 2018

Splattered Autumn Window

This is my post at the Tutti Designs blog today.

Hello Friends, Diane here on this last day of July
with a newly released  Tutti Design die 'Autumn Window'.

This is a smaller die that I just LOVE the size,
 perfect for a card front!


I started by die cutting a Tutti Designs Dotted Nesting Rectangle
Then 'splattering' it with 3 different colors of Oxide inks
Distress Oxide Fossilized Amber
Distress Oxide Peeled Paint and
Distress Oxide Spiced Marmalade.


I popped up Tutti Designs Autumn Window on top of the splatters
which I die cut from white card stock.

I added a few scraps of designer papers under the rectangle for a bit of added interest
and a hemp bow....
simple but easy to mail!!

Tutti Designs Autumn Window


No automatic alt text available.

Tutti Designs Dotted Nesting Rectangles


Visit here daily for fabulous inspiration on how to use your Tutti dies!!

And here are some Tutti Designs quick links:


Thank you for visiting with me today!

Entering the following challenges:
Use Your Stuff .... Free Week or Image


Monday, July 30, 2018

Alcohol Ink Butterflies

I was talking to my BFF Dar at 
Dar's Crafty Creations
about a few 'free' days I had open on my blog and asked her if she wanted
to join in a challenge with me that I picked out....
of course she said yes...
and I chose Sum More Fun challenge....
I think it was because they have a 'mood board'
and if you visit my blog often you know I adore mood boards.


Blog Badge


For my card I choose the largest picture on the left.


Quite awhile ago, I grabbed some watercolor papers and my 
Tim Holtz Adirondack Alcohol inks and began making some paper backgrounds
which I set aside and never used until today!
The background behind the Memory Box Butterfly Collage die cut (one of my very favorite dies)
was actually pieced in as I had used the main piece for a card
that will be 'debuting' on my blog on Wednesday.
(so make sure and stop by to see that)


In trying to use some more things from my stash, 
I added gems to the butterflies and a few sequins for sparkle.

Make sure and pop on over to see Dar's beautiful creation and also
to come back Thursday as Dar has picked out a challenge
and has challenged ME...can you tell we are having fun?

Sunday, July 29, 2018

Cupcake Kind Of Day

This is my card on the Sparkle N Sprinkle blog today using
and a whole lot of FUN glitter!

 Products used are:
Stamps:  CupcakeRainbow Digi908
Glitter:  MeadowSpark G1014
Tangerine GM2043,
Caution Yellow (Retired this month) use Daisy GM2019
Nuvo:  DeluxeAdhesive 200N
Crystal Drops Double Denim 691N, Party Pink 690N
Other:  Tear-ificTape ¾” SAT05
Glitter Brush SG1400
Misc.  Cheery Lynn Fishtail Banner

For the background of my printed CupcakeRainbow digi,
I added Double Sided  Tear-ificTape ¾” along all 4 sides of a piece of card stock.
I then added glitters one at a time pulling off the adhesive backing one at a time
using glitter colors 
MeadowSpark , TangerineMystical MauveCaution Yellow.


The  CupcakeRainbow digi was printed, then die cut on a stitched rectangle.
Starting at the top, I added Nuvo  DeluxeAdhesive to one rainbow stripe
at a time.


To make this easier, and just add a small amount of glitter at a time I used the
Nuvo Craft Spoon and Glitter Brush, making sure to brush off each glitter
color before I began the next (this helps to not get the colors mixed).


I digi printed the sentiment and an extra cupcake and mounted on a
fishtail banner for the top.
To finish I simple added several dots of
Nuvo Crystal drops  Double Denim and  Party Pink.


Thank you for visiting with me today!


Stamps:  CupcakeRainbow Digi908
Glitter:  MeadowSpark G1014
Tangerine GM2043,
Caution Yellow (Retired this month) use Daisy GM2019
Nuvo:  DeluxeAdhesive 200N
Crystal Drops Double Denim 691N, Party Pink 690N
Other:  Tear-ificTape ¾” SAT05
Misc.  Cheery Lynn Fishtail Banner

Wednesday, July 25, 2018

Angel Fish

I am filling in on the Cheapo Dies blog today
with this fun card below.
Please scroll on down for The Sisterhood of Crafters post
and my Back To Basics and Beyond post.
Three in a day...it happens lol!


Hello, Diane with you today with a fun AND easy card
using the Cheapo Dies Angel Fish.


This die is a nice big size making the fish the focal point of the card.


I die cut using all scraps  and cutting twice so I could add a shadow background
under the main fish.


I added a fun sentiment that I thought was perfect for my Angel Fish
 and a few sequins.  
The top panel was another piece that had been sitting on my work table,
I added a bit of TH Oxide ink behind the cutout (salty ocean)
and my card was finished.

Have you seen all the fabulous 'summer' dies at Cheapo Dies?
You MUST take a look as there are so many to choose from
at an extremely reasonable price...don't miss out!!

Let's Go Camping~GRRRR

The new challenge theme at
Summer Vacation 
and being hosted by our very talented 'sistah' Debbie.

I used to love camping and decided to use that theme for my card
with a little bit of 'fun'  thrown in!!


Have you ever been camping, gone to use the 'facilities'  at night and heard
the underbrush snapping on your journey and YIKES
first thing you think of is a bear, well at least in Michigan
you might have that experience!!
So that is how my camping card begin...with those scary thoughts!!


I created this card by first stenciling a big bad moon in the background
using some ever faithful TH Distress inks.

The bear and sleeping bag are from an older stamp set of  SU's
that I believe is called 'Under The Stars'.

I added a few die cut trees, and a rolling hill.

Take a peek over at The Sisterhood blog and see all
the Fabulous creations my 'sistahs' have created!!

Happy Fall

A new challenge today at the
and it is a SUPER easy one
'Embossing Folders'.

Now I don't know about you, but I have an over abundance of
those folders, in fact my newest is from SU and I had planned to use that,
but last fall I was messing around with some
Sizzix adhesive backed foil paper and a leaf embossing folder
and came up with this background.


The foil had a plastic 'like' back on it and it also embossed it, 
so I saved that piece for a further use.


Since I was embossing with a folder, I decided to carry on with
also embossing with a fun Stampabilities (2002) leaf block stamp
using Sparkle N Sprinkle Timber embossing powder (one of my very favorites)
and Versamark.

I encourage you to join in this super easy challenge
and also to visit and see all the beautiful creations
my teammates have created!

Tuesday, July 24, 2018

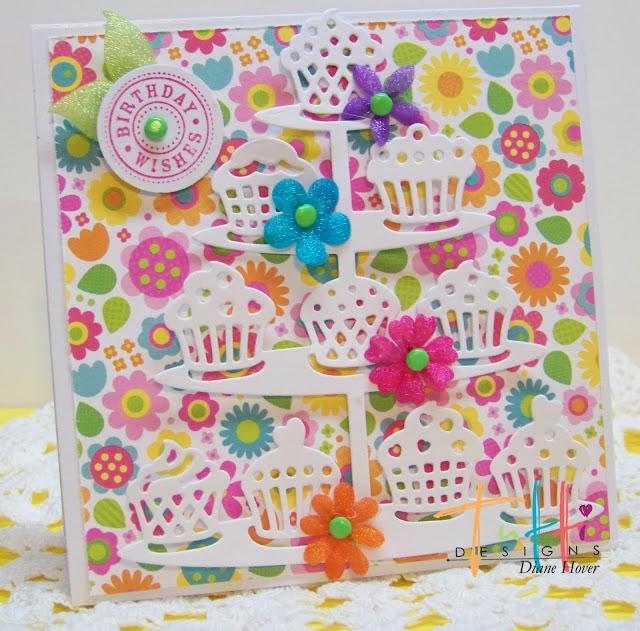
Birthday Cupcakes

This is my post on the Tutti Designs blog today today.
How about a few birthday cupcakes, 
or how about  A LOT of birthday cupcakes...lol!

The die I used for these two cards is the Cupcake Stand.
I added a pretty paper background and  a few random flowers to this card.


The second card I embossed the background and cut the cupcake stand from 
a pretty multi colored paper.
This is a nice sized die that works well for a square card,
it seems to do most of the work for you,
just by adding a few other elements and you have a quick birthday when need be!


No automatic alt text available.

Visit here daily for fabulous inspiration on how to use your Tutti dies!!

And here are some Tutti Designs quick links:


Thank you for visiting with me today

Sunday, July 22, 2018

Emma

I have a card today on the Sparkle N Sprinkle blog using the adorable new stamp set


All the products used are linked below for your convenience.

GlitterGypsy Red GM2005,
Tangerine GM2043
Embossing PowderRed Apple EP276
TonicTimHoltz Stamp Platform 1707E
OtherTear-ific Tape ¼”  Sat01,
Misc.:  Ribbon
Purchased Butterfly
Tutti Designs Scalloped Rectangle Die
Spellbinders Banner Die
Confetti Embossing Folder

Let me tell you a little bit of how I used all the products above to create this card.


I first started with the Nuvo Blending Sponges  and Carrot Stick ink from the
Just sponging fun dots on an embossed confetti card stock.


Next I stamped the image from Emma’s Best Birthday
I then used Water Color Pencils Hair/Skin Tones to start
water coloring her hair and skin tones on water color paper.


I finished coloring her in with Aqua Flow Watercolor Pens Surprise Party
and a water brush.


I added Nuvo Deluxe Adhesive glue to her apron and shoes, 
then sprinkled Gypsy Red glitter on.
I did the same for the 'frosting' on the cake, but this time I
used Tangerine glitter and a Nuvo Craft Spoon to apply.
If you are not familiar with this spoon, it allows you to easily apply
glitter in all those tiny little places...so neat!


I added a piece of Tear-ific Tape ½” to the inside,
then added Tangerine glitter to the adhesive strip.
I also stamped the sentiment with Versamark (both inside and out),
then embossed with  Red Apple embossing powder.


I added little dots all around the cake image.
A pretty yellow gingham bow and purchased butterfly were 
added to finish.
Also in the making of this card I used a few of my very favorite products,
TimHoltz Stamp Platform to stamp my images with. 
I use this daily and can't imagine how I would stamp without it..love this thing!
Also I use on a daily basis the double sided Tear-ific Tape ¼” and 
And last but not least, I have the Nuvo Stamp Cleaning Pad along with


Thank you for visiting with me today,
I know it was a long post, but I hope I have given you some ideas with
some of these fabulous products! (all the links are above).

Friday, July 20, 2018

Christmas Card Holder

The Cutting Cafe blog is having Christmas In July.
I made this set before and I just LOVE it...it can hold all of your Christmas cards.
Plus the fact it is extremely easy to make and it will also hold your 6 x 6
paper pads.

Here is the finished box File Folder Box Holder, even full of some of my cards..


This is the front of the box.


and a back view


and of course the decorative view.


I love it so much, it sits on a shelf in my creative room.
Make sure and pop on over to The Cutting Cafe blog on the 21st to see all
the fabulous designs from the Design Team.I missed the last post but I have my
cute little project that will come on my blog once I am home from vacation again.
With that being said, once I am home on Monday I will finally be home for two straight weeks,
which I am looking forward to as I have been going nuts trying to keep everything up...
this old lady is TIRED..lol!!
I also had major computer issues, which I won't even go into, but it has shut my Cricut down and I haven't had the
time (or energy) to get it back up and running and my camera quit, so I had to take pictures with my phone
and of course with the computer issues it wouldn't load the pics from my camera...on and on...so ANYHOW...
a little birdie told me that in July there are all kinds of
pop up sales going on at The Cutting Cafe...just keep visiting the shop HERE.

Wednesday, July 18, 2018

Coffee, Tea, or Me

It's the third Wednesday of the month and that means the start of 
a new theme and mood board at 
Double D Challenges!

It is Coffee and/or Tea....
how fun is that using the mood board below for inspiration.


For my inspiration I decided to go with a coffee cup
using one of the colors from the tea canisters in the top right corner.


The stamp set I used for this is an oldie but goodie!
I used to belong to Unity's Kit of the month club
and both the cup and the sentiment are from that.


All the papers came from my scrap bag,
the crimped paper is made using my old Fiskar's Crimping tool....
yes I keep everything lol!

Make sure and visit Double D Challenge blog and 
see all the wonderful variety of coffee/tea the design team has to offer,
it always amazes me all the different designs we all come up with!

Entering the following challenges:
Addicted To Stamps and More .... ATG
Craftaholics R Us .... ATG
Crafty Friends  .... Food or Drink

Tuesday, July 17, 2018

Christmas In July


This is my post today on the Tutti Designs blog.

Today I have a fun post a bit out of the ordinary for a hot July day.
Christmas In July.

 I have 3 cards I am calling
Shine~Fun~Cabin
I think you will see why once you see each card.
All three cards are using the Tutti Designs
large Merry Christmas die.

Shine
is the name of my first card.Very fitting as I used not only a shiny
background paper, but a red mirror card stock
cut with the Tutti Designs Nesting Stitched Banner die.
A perfect place to add my Merry Christmas die cut.
I finished it off with a pretty ribbon bow and a few pearls
placed on the snowflakes.


Fun
is the second card, I think the ragged polka dots just shout out 'fun'!!
The Merry Christmas was adhered to a Tutti Designs Nesting Stitched Oval.
I added a ribbon bow and a cute wood button.


Cabin 
is my third card,
I think the name fits with all the plaid, a bit primitive!
I die the Merry Christmas from a green plaid paper,
an place it upon a Tutti Designs Nesting Stitched Rectangle.
I added a wood button to this card, keeping it a bit more simple.


No automatic alt text available.

Makes sure to stop by the blog daily to see more fabulous inspiration
using the Tutti designs dies!


And here are some Tutti Designs quick links:


Thank you for visiting with me today.