Sunday, July 31, 2016

Sparkle N Sprinkle August Reveal and Blog Hop

Welcome to Sparkle N Sprinkle's
 August 1 New Reveal Blog Hop!


We have five new stamp sets to share with you today.  These new sets are 20% off until the 3rd of the month.  So once you finish the blog hop, head on over to the store and start shopping.  All of the new sets are available on cling mounted rubber or as a digital image.  


The sets are:


Eskimo Kisses 788 (digi version DIGI788)
Pool Friends 792 (digi version DIGI792)
Get Your Craft On 794  (digi version DIGI794)
Stella-Happy Meds 796  (digi version DIGI796)
Flower Cart 798  (digi version DIGI798)


On August 3rd, ONE GRAND PRIZE WINNER will be selected from the comments left on the Designers' blogs listed below. Please leave a comment with each Designer in order to be eligible for the Grand Prize.  You never know who the Mystery Designer will be that has the winning comment.

The Grand Prize Winner, which will be announced on the SNS Facebook page and on the SNS Blog, will receive ALL of the new stamp sets released this month (or the digi versions, if preferred).


The Blog Hop order this month is:


Anne
Shona
Jess
Eret
Diane
Chris
Belinda

(*Tip: if you have difficulty with a particular link, try clicking on the Designer's blog title to send you to their Home page.)


We hope you enjoy the New Reveal Blog Hop as much as we do.  Thanks for joining us and remember to comment on each of the Designers' blogs to be eligible for the Grand Prize.  
 Wonder who the Mystery Host will be this month????


The Sparkle N Sprinkle Creative Challenge also begins today.  There are lots of prizes and recognition badges.  Come check out how you can become a SNS Featured Artist as well.  The theme is always Anything Goes using Loose Glitter, Embossing Powder, and/or Flock.


Have you checked out the SNS YouTube Channel featuring Demo Donna?  If not, then you are in for a real treat.  Subscribe today to get all the latest Demo Donna tips and techniques!


And now onto my project!


I used the digital version of 
'Pool Friends'
for my card.

As soon as I saw this cute, cute image,
I knew I wanted to make a step card.

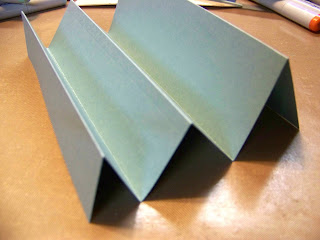
I started out with an 11 1/2 x 8 1/2 piece of blue card stock.
I scored it at 1 1/4",  2 1/2", 4", 5 1/2", 7 1/2" and 9 1/2".
You can make whatever width you want to fit your image,
but I cut mine at approx. 5 3/4".


Next you fold mountain, then valley, mountain and so on
alternating each one.
When done I just trimmed off the back piece I didn't need.


After printing the image I colored it in with Copics.
(If using the stamp version, stamp with Memento Tuxedo Black Ink).
Once colored I fussy cut just along the top 
as shown in the finished card.

I adhered a piece of white card stock to
When cutting, lay your die face down on the adhesive backing side
NOT the card stock side.
I cut two waves using a Joy Crafts die.

here is a side view.


Once cut I simply pulled off the backing
and using my 'finger' tool. I applied Waterfall Glitter.

I also applied glitter to some of the 'waves'
on the image using a Sakura Glue Pen  and 
more of the Waterfall glitter.


The image and waves were adhered to the step card
with Tear-ific Tape 1/4".

Now make sure to leave comments along
the way to win the ENTIRE release of August
stamps.
You should be visiting Chris next!


Diane Hover
Stamps:  Pool Friends 792 digital
Glitter:  Waterfall G1071
Super Adhesive Sheets SAS02
Memento Tuxedo Black Ink Pad ME-900
Copics
Tear-ific Tape ¼” SAT-01
Other:  Joy Crafts Wave Die

Deer Duo

Happy Sunday all!
It's the last day in July can you believe it?
Just where does the time go?

I have my last 'July' Sparkle N Sprinkle project to share
with you .


I started out using a Memory Box Frosted Christmas Tree die.
Once die cut, leave the tree in the die as shown.


spread Dreamweaver  white embossing paste all over the back of the die.
You can leave it a bit thick as it will look more like snow on the branches.


Carefully remove the die cut from the die
being careful not to touch the paste.


Completely cover the tree with  Twinkling Clouds Sparkle N Soft.


Now let your trees (I did two) dry completely.
Also quickly clean up your die and pallete knife.


Once the trees are dry, gather your supplies together
to complete your card.
I cut two 'snow banks' using Lawn Fawn dies
and adding Brushable Glue along the edges then Sparkling Snow glitter.


I printed the digital image of Deer Duo stamp set
and colored them in with Copics, then fussy cut them out.
However, did you know that Sparkle N Sprinkle now offers
'cut files' for some of their stamps?
You can get a cut file for the deer stamps HERE.

Gypsy Red glitter was added to the deer and the presents.


Now my card is complete and all sparkle-y and pretty and ready for Christmas!


Make sure and stop back by here at 9pm tonight as it is 
'Reveal Time'
at Sparkle N Sprinkle where you can see the entire August release.
Just by visiting and commenting on each of the designers blog posts
you could be the lucky winner of the entire release!

Make sure and pop over to the Sparkle N Sprinkle blog next Sunday as well,
as I have a post there using one of the new August stamp sets!

See ya here tonight at 9pm!!!

Friday, July 29, 2016

Be Always Blooming

I am the hostess this week at the
Fussy and Fancy challenge blog
and I chose the theme
'A Walk In The Garden'.

We have a special  gift voucher this week for one lucky winner and it is to:

You all know how I like digging in my bags of pre-cuts and scraps
and that is just what I did for this card.
I won't be able to list where each piece came from as I haven't a clue..lol!


I did use a beautiful embossing folder from 
Cuttlebug Preserves set.
I don't know about you, but I decided I love to emboss a
panel, then adhering it to the card front
verses just embossing the front of the card.
I think you get a much neater embossed look that way.


I used up the last of a couple of pansies and a few purple flowers
I had on hand (though they look black).
A few greens were tucked in and a cute little birdhouse as well!

The butterflies came from my butterfly 'bag'
(yes, i even have a scrap bag of butterflies)!

The ribbon is the latest from Really Reasonable Ribbon
with a tiny little heart tied on.
The sentiment I stamped from a Flouishes set.
'Always Blooming'.


Now head on over to Fussy and Fancy
and see all the pretty things the design team has created to inspire you!

Entering the following challenges:
Aud Sentiments .... ATG + Sentiment (8-1)
CRAFT. .... Summer (8-3)
Butterfly Challenge .... Butterfly + P is for Punches and/or PINK
Really Reasonable Ribbon .... Pink and Purple with Ribbon

Thursday, July 28, 2016

Christmas Bells

This is my post on the
Tutti Designs blog today...enjoy!

Happy Thursday to you!
Another gorgeous Christmas die to share with you today.
This one is called
I think this die could very easily be turned into a wedding card as well!


I certainly had fun making this card all shimmery and full of
'sparkle-y' goodness!


I die cut the bells from an embossed silver and white designer paper.
Then I popped the bells up om a blue shimmer paper.


The background is all silver glitter paper.
I didn't want any of the white card base to show,
so I simply adhered the 6 x 6 paper to the front (as shown)
then used my trimmer to trim the excess away!


To finish a silver bow and a tiny blue jingle bell were added.

Make sure and check out all the great places to
visit the new Tutti Designs dies.

Thank you for visiting with me today.....
"I" will be here each and every Thursday!!

Come back tomorrow for more fabulous inspiration!

Happy creating!


Diane

Entering the following challenges:
Little Red Wagon .... Christmas In July
Winter Wonderland .... Use Die Cuts/Punches Add a Charm
Christmas Card Challenge .... ATG (8-5)
Dream Valley .... Christmas In July
July Rudolph Days Challenge .... ATG Christmas (7-31)

Wednesday, July 27, 2016

White On White Challenge

Here it is the end of July already and
I am stepping in to host as one of other 'sistahs'
has had to step down from
The theme for this challenge is White On White
meaning 'WHITE only cards.

Last Christmas time, I had purchased a beautiful
Memory Box Snow Flake die.
and as usual with my dies, I had to test cut it first.
I cut it on white vellum and it has been waiting to be used
ever since!
I figured this was the perfect time to put it to use!

(Sorry the picture is not the best, but it is so difficult
to photograph white on white, let alone vellum.)


I adhered it on an embossed 4 1/2 x 4 /12 square card front, 
using tiny bits of Scor-tape in each corner.

Tiny white pearls were added to the centers of random snowflakes
and a ribbon from Really Reasonable Ribbon club,
which I adhered a snowflake button to.

Pretty easy!!  I did however choose to leave it without a sentiment,
just in case I might need it for a winter wedding.
If not I can always add a 'sparkle-y' Merry Christmas later!

Pop on over to The Sisterhood challenge blog and see
what my 'sistahs" have created...join in with us,
we would love to have you!

Entering the following challenges:
One Stitch At A Time .... ATG with dies (8-6)
Fairytale .... Christmas In July (8-2)
My Time To Craft .... Christmas In July (7-29)
Scrapyland .... Emboss It

Saturday, July 23, 2016

Happy Birthday To You

I did a super fast and fun card today just perfect
for a birthday using the new 'Birthday Party Fun' stamp set from 

There are several stamps in this set to mix and match
and also a cut file that comes with.

I used both the balloon cut file and the balloon stamp
on scraps of polka dot papers.


So fast~So fun~So easy!!

I had a birthday wishes pack of paper from DCWV
which seemed just perfect for this cute balloon image and happy birthday sentiment!

I added twine for the balloon strings,
 but it does come with a stamp for that, too!

Take a visit to The Cutting Cafe Shop and see all
the new stamps and other 'crafty' things there.
Custom stamps are available, too

Make sure and come back here each week
as I will have more creations with these fabulous stamps!

Entering the following challenges:
Word Art Wednesday ....ATG

Friday, July 22, 2016

#1 Grandson

Well, today is a sad day of sorts.
It is my last post on the

The blog is closing down for the time being after 
5 years of wonderful blog challenges.
The owner Joanne needs a much needed break,
something I am sure we can all understand.
I wish her the very best and want to thank her
from the bottom of my heart for having me on board!

So, the last challenge is  'NUMBERS' and is being sponsored by
and I chose the adorable image


Now before you all go and tell me what a wonderful job of
coloring I did (lol), let me tell you this comes with
a pre-colored image and that is what I used,
beautiful isn't it?
I did however, add green glitter pen
to the dots on the frog and the dragonflies as well.


I had a piece of SU Night of Navy card stock
left on my table from yesterdays post and
thought it to be the perfect base for my card.

I have found that after discovering the Recollections
110# card stock at Michael's (it comes in black, white & cream)
I am neglecting all my pretty SU card stocks,
so it seemed pretty good to use this one!

I embossed a Gable Green card stock
with the cutest 'bumpy'  EB folder from SU
called Decor Dots.
It just reminded me of warts on a frog..lol!

My 'number' sentiment is computer generated .

I added a last piece of gingham ribbon scrap
and a button onto that.

I do hope you will join us for our very last
challenge at Chocolate, Coffee & Cards...see you there!

Entering the following challenges:
Creative Craft Cottage .... ATG (8-3) 
Cuttlebug Mania .... Summerstop (8-1)

Thursday, July 21, 2016

Celebrate The Wonder

This is my post on the 
Tutti Designs blog today.

Happy Thursday to you!
I have another new July release die to share with you today.
This one is Scrolly Deer Edge.


I started out by embossing a navy blue star background.


I die cut the deer from a white glitter paper
then once again from a white craft foam.
I like using the foam behind some of my die cuts to give it
a bit of 'umph'.
(A Tip is to use the same color craft foam as your die cut
so if you don't have it perfectly lined up, it won't show).

I simply glue the die cut to the foam, 
then adhere the entire piece to my background.
Here is a side view to give you a better idea of the foam.


I added a little red pearl nose
(sorry I couldn't resist..lol)
and a red and white striped twine bow.

A sentiment was added to finish.

Make sure and check out all the great places to
visit the new Tutti Designs dies.

Thank you for visiting with me today.....
"I" will be here each and every Thursday!!

Come back tomorrow for more fabulous inspiration!

Happy creating!


Diane


Entering the following challenges:
Fairytale .... Christmas In July 
Crafting By Designs .... Christmas In July (7-26)
Crafty Gals Corner .... Christmas In July (7-26)
Scrapyland  .... Emboss It and Die Scrapyland sells (Tutti)
What If Wednesday Challenge   The House That Stamps Built

j2016