Thursday, March 29, 2018

Scraps and More Scraps

Do you save all your scraps of papers?
I have 12 x 12 ziploc bags for each color
and they are FULL!
So, one day I sat down and decided to make a few scrap cards
using only scrap pieces, it was a fun and relaxing day!
I also used my Pinterest Scrap Card Inspiration board.
I have around 88 pinned, and decided it was about time I
use that as well.    I scrolled all the way to the bottom
and started from there...fun!

I managed five cards before I got bored
and here they are:

The first card I cut the scraps with a Cheery Lynn Designs Fishtail banner die.
The bow and sentiment were 'rejects' from another project.


The second card all I added were a few other 'rejects',
the MS punched flower and the sentiment.


The third card is pretty self explanatory,
using a circle punch.


Fourth card, same as above, but using a bigger circle punch


And the last , my 'struggle card'.
I just could not get those punched hexagons to line up for me
but decided to show it anyways (that was when I quit).
This is the type of card you would give to a
'non' card-maker as they wouldn't be so critical IF they noticed at all...LOL!


So, that is the start of my scrap cards, only 83 more to go....
yep, I plan to let my scrap board inspire me even more!!

Wednesday, March 28, 2018

Spring Flowers

Today at The Sisterhood of Crafters our hostess is the
lovely and very talented Debbie
and she has chosen a theme of
'Spring Flowers'.

Great theme as who doesn't love Spring AND flowers!!

I decided I wanted to get back into my coloring as it has been awhile
and it seems like starting all over again!
(now mind you, I'm writing up this post in January..yep jumped way ahead)


I die cut a Spellbinders Magestic Circles die,
then stamped an image from Inky Antics
in Versamark and Sparkle N Sprinkle Gold fine detail embossing powder.
I used my Tim Holtz Stamp Platform to get my stamp
positioned where I wanted it.


I colored the image with Copics.
I kept the card rather simple and easy to mail
by just adding a designer paper that was on my desk
rejected from another project.

I added 2 little border/edge pieces using a die (expandable tiny borders)
from Cheery Lynn Designs.
This is a neat die as it has multiple edge choices on it
and funny thing is, I have had for a very long time
and finally pulled it out to use,
tells you I have too much I guess!

So head on over to the challenge blog at The Sisterhood
and see all the inspiration and join in with us!

Entering the following challenges:
Simon Says Wednesday .... ATG
Word Art Wednesday .... ATG
Scrapyland .... ATG


Tuesday, March 27, 2018

Easter Floral Basket

This is my post on the Tutti Designs blog today.


Hi Diane with your today using a pretty
Tutti Designs Easter Flower Basket die.
Now the name of this basket might have the word 'Easter'
in it, but this basket can be used long after Easter, well into spring!

I have two different cards using this same die.
Both are very simple, but pretty and will be 'easy mailers'


The first card I simply embossed a background, then added a strip of
pretty designer paper down the middle.
The basket die cut was popped up on that.
I added a bit of grass in front and a bunny.
To finish it , I added a pink gem to the bow.


The second card is using the same basket die,
a designer paper in the background, a few gems/pearls added,
and a cute little sticker bird to finish!

Make sure and come back daily for more fabulous inpsiration
using these awesome dies!


No automatic alt text available.

For your convenience, here are all the Tutti Designs quick links you will need:


Thank you for visiting with me today!!

Sunday, March 25, 2018

Kindness

I have a card today made for Sparkle N Sprinkle
with a water colored  Iris
using the newly released stamp set 'Bearded Iris'.


Supplies Used:

Embossing PowderSilver Detail EP257
OtherWaterBrush-LG (waterbrush)
Misc:  Water Color Paper

This  card was very fun and easy to create.
I stamped the  Bearded Iris  with Versamark on water color paper,
then embossed with  Silver Detail  embossing powder.

To add the water color
I recycled a bag that the SNS stamps arrive in
as my 'palate for my water colors.
Using the color Indigo Dawn from the
 Aqua Flow Watercolors Winter Skies ,
I simply added it to the plastic.


Then using the  WaterBrush
I started adding Indigo Dawn to the Iris
to the leaves.


Once the water coloring was done,
it was die cut using  Ribbon & Bow Layering Die Set
Nuvo GlitterDrops Purple Rain  were added around the image.


This was set aside to dry, then a die cut using Moroccan Mosaic simply Screens 
was cut from gray card stock and placed over a strip (cut to fit) of
Sticker Paper .  Purple Fig glitter was then added...so pretty!
A piece of Craft Perfect Embossed Paper Broken Glass  was added to the bottom.
The sentiment is part of the Bearded Iris stamp set.


Thanks for taking a look today and be sure to leave a comment both here and on my post on the SNS Blog for a chance to go shopping at Sparkle N Sprinkle.  No one knows who the Mystery Designer is this month (and it might just be me).  There will be new projects on the SNS Blog every day for your inspiration and for increasing your chances of winning.  Good luck!

Wednesday, March 21, 2018

It's a Girl~Congratulations

Time for a new challenge at Double D challenges
and Team Darlene is hosting with the theme
'Just Wing It'
and the mood board below.


I took this challenge to be anything with wings and went with a baby card
using some very OLD stamps.


The stamps I used are from a Unity Kit of the Month October 2009.
I used to belong to that and really built up a lot of stamps that way.
It was fun receiving new stamps every month,
however that was when I was working and could afford to do so...lol!!


Not much more to say about this card,
pretty self explanatory.

Make sure to pop on over to the Double D Challenge blog
to not olny see all the fabulous designs from the teams
but to join in with us as well, there is a neat prize every single challenge!!

Tuesday, March 20, 2018

Bloom

Today is the first day of Spring and I thought it would be
a good day to share my 'BLOOM' card
thinking maybe Michigan would get the hint
and give us warm air and sunshine and let the 
Spring flowers 'bloom'!

I am showing my project I made for our
design team post at The Cutting Cafe blog.
on the 21st (usually in the afternoon).
You don't want to miss it as all the designers
have their project in one place making it super easy to see all!

The Cutting Cafe Shop has numerous word shaped files to choose from,
they are so fun and so easy to cut,
but this time we were all asked to come up with a word of our own,
you won't find these in the shop, 
however YOU can ask for
The Cutting Cafe to create a 'custom' word (or numbers, a name etc) for you.


For my word I chose the word 'BLOOM'
This card has 2 layers, card base, next layer to cover the fold,
which I then embossed with a leafy EB folder.
The next layer I used a Graphic 45 paper
then added embellishments to that.
The fourth layer was letters to go on that, but I choose to leave as is.


So make sure tomorrow to go to 
The Cutting Cafe blog to see all the fun custom word we each chose...how FUN!!

Entering the following challenges:
Dream Valley .... Spring Colors
Crafting With Friends .... ATG
Crafty Sentiments .... Shaped cards
Craft-Dee Bowz .... ATG with a handmade bow

Easter Cards

This is my post on the Tutti Designs blog today


Hi Diane with you today,
continuing with my Easter cards I have made for this year.
Can you believe Easter is April 1st?
Seems so very early this year!

I have two cards today.  
The first card is using Tutti Designs Praying Hands Egg.
I simply used a glitter paper for the background
giving off a major amount of sparkle!
The egg itself was die cut from a water color paper
and I added a pretty bow to finish.


Entering the following challenges:
Make My Monday .... Easter Fun
My Time To Craft .... Easter/Spring

The second card uses Tutti Designs Cross In The Vine die.
I used a pretty , soft background paper and to soften it even more,
I added a piece of vellum on top.
The ivy vine was cut with a watercolor paper, then I cut the cross from
a solid paper and paper pieced it in.
A sentiment and pearls were added to finish!


Make sure to visit us daily for more fabulous inspiration for using these dies!


No automatic alt text available.


No automatic alt text available.

For your convenience, here are all the Tutti Designs quick links you will need:


Thank you for visiting with me today!

Entering the following challenges:
See Above

Sunday, March 18, 2018

I Love Old Trucks

This is my card on the Sparkle N Sprinkle blog today

Hi, Diane with you today with a card using the newly released stamp set
I Love Old Trucks.


I created a great masculine card today using all the
fabulous products below

Glitter CampfireGM2042
Misc:  Embossing Folder Cuttlebug,
Sponge, Black card Stock

I started by cutting a black card stock base 5 1/2 x 5 1/2.
Next I cut a white card stock base 5 1/4 x 5 1/5.
I embossed this piece with a Cuttlebug embossing folder,
then using a sponge,
Knowing that I was going to be covering up the center
I didn't worry so much about sponging most of that.


I cut a piece of white card stock,
then stamped it with the sentiment from the stamp set I Love Old Trucks.
but, I first cut the stamp apart into 3 pieces,
then used my Tim Holtz Stamp Platform to line them up
What's nice about the platform,
I can easily put them back in the order they were to stamp them like they came.
Using the Sakura Glue Pen on each heart,
I added Campfire Glitter to each.


Next, using the platform once again,
I applied first Nuvo Medium Glue Pen 
to the more intricate areas of the stamp
and Nuvo Large Glue Pen to the rest.
When using the large pen, 
you don't want too much pressure when adding the glue
to the stamp, or you will lose some of your design.
Carefully stamp on your black card stock piece.
Let the glue dry to a tackiness 
(when you don't see any more milkiness color of the glue)
Press down lightly and make sure all areas are covered.


Using your Mini blender brush, 'scrub' all the excess flakes off.
You now have a gorgeous gilding flake card full of wonderful shine!


Once done, I simply layered all the pieces together!


Make sure to leave a comment both here and on my post on the SNS Blog for a chance to go shopping at Sparkle N Sprinkle.  No one knows who the Mystery Designer is this month (and it might just be me).  There will be new projects on the SNS Blog every day for your inspiration and for increasing your chances of winning.  Good luck!
Thank you for visiting with me today!!

Entering the following challenges:
Dragonfly Dreams .... All That Glitters
Love To Create .... Mixed Media (gilding flakes)


Saturday, March 17, 2018

Tis Thee Irish

Happy St. Patrick's Day!!

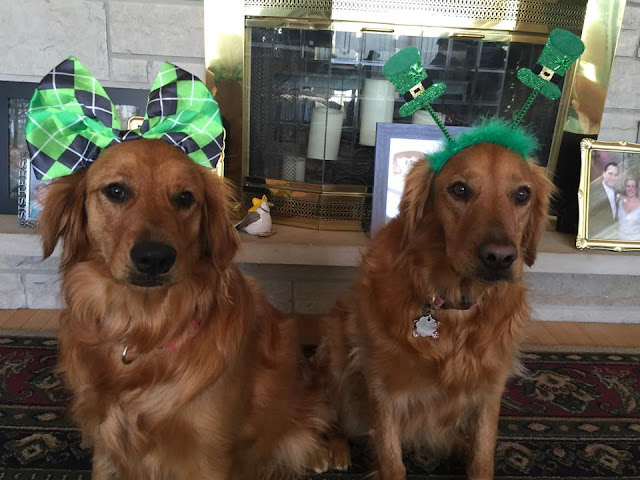
I had to share this, I stole  'borrowed' off of Facebook,
these are my friend Dianne's Goldens
one is Lucy (she is just a pup)
and for the life of me I can't think of the male's name..maybe later.  NOT a male, it's a HER
and named Cassie..sweet girl!!
I don't think she will mind I 'borrowed' the photo's,
just too cute not to share!


Just for fun today I created seven cards using several
If you are not familiar with these dies then all I can say is
you are missing out...lol!
They cut fabulous and are extremely reasonable.

Being St Patrick's Day I used seven of the dies just for this occasion.
However, these dies would work well for graduation,
wishing someone good luck on a new job or promotion, retirement
and so on, I think you get the idea.

I am not going to go into detail of how each card was made
as I think you can tell I added the usual,
papers, stamps, sequins ribbon etc.


Entering the following challenges:
Sweet Stampin .... Paper Scraps and stamping
Crafty Card Makers .... Go Green


Entering the following challenges:
CAS on Friday .... Celebration and Sequins

All links are given above....I hope you enjoyed my cards
and thank you for visiting me!

Entering the following challenges:
SEE ABOVE

Thursday, March 15, 2018

Frame It

March 15th already
and that brings us mid-month to a new challenge at
Dies R Us with the theme being 'Frame It'.

Lots and lots of beautiful frame dies to choose at the
Dies R us store!


I chose a favorite frame set of mine
Impression Obsession All In One Frames Set 2
this set cuts 5 different frames all at once,
you can choose to use all or only 3 like I did
and save the rest for a future project!

Pretty simple card, but oh so pretty!

I used a lavender background paper from Papermania called French Lavender.
The frames were cut from The Paper Studio Blanc Boutique 'Pearl'.


Next came Memory Box Precious Butterflies cut from a purple metallic paper.
This set is being retired, so if you want it you had better grab it now!
A few pearls were added to the butterfly to finish!

Take a peek at all the 'framed' goodness at the Dies R Us challenge blog
and join in with us!!