Thursday, September 8, 2016

Morning Chat

This is my blog post on the
Tutti Designs blog today.


I have the most sweetest and adorable die to share with you today!
It is from the new release and called
Not only a cute die but a cute name as well!


Here is the card I created.


Myself, I love the clean and elegant look of a silhouette.
Nothing better to achieve that look then a black card stock!

I used a black card stock as the base,
then cut a white card stock panel and embossed on it.
I think you get a cleaner look that way then embossing
on the card front itself, plus I like the layers!


The embossing folder I used had embossed corners only,
making it a perfect choice for my little girl die cut
to sit in the center.

Tiny white pearls were added to the center of each flower
and a pretty yellow bow to complete.

I kind of wonder what they are having their
'morning chat' about, don't you?

Make sure and visit all the other inspiring places to see the
new Tutti Designs dies:


Thank you for visiting with me today!
'I' will be here each and every Thursday.
Come back tomorrow for more fabulous inspiration!

Diane

Wednesday, September 7, 2016

Down On The Farm

Well my friends September is here and it is starting to
feel a bit like fall here in Michigan.
It's odd, but the air and days just 'feel' different.
(edited to add)  Except for today, it is
hot~hot~hot!!
I was up and down all night with the heat
and they say next week it is to be a cool 40
at night....only in Michigan
can you wear shorts one day and long johns the next...LOL!!

We have a new challenge up and running today at
and I have put together this awesome tile/mood board
to give you lots of inspiration!

Our theme is
'Down On The Farm'


I made a rather large card as the dies I used were rather large themselves!


I got in my scrap bags of papers and pulled out a piece of
what I believe was from SU paper
and used it for a sunny background!

I have to admit, I ordered this die  (Elizabeth Crafts laundry) specifically for this challenge
(I am known to do crazy things like that)
and have to say it was very 'picky' but also very fun to work with.

I cut the quilt ,then ran a bit of distress ink over it to pick up the design a bit more.
The 'long johns'  were cut from cordinations paper, then sanded to give
a bit of detail and a worn look.

Check out those tiny, tiny clothes pins...goodness yes,
I cut them out and glued them on...very fiddly!

Grass, chicken feed (glitter and frantage) and of course the chickens  (Impression Obsession) were added
for an even more 'farm look'!

To finish I added a stamped sentiment and ribbon and jute twine!

Now you have to, and I mean HAVE TO
head over to the Double D blog and see
what the design teams have created....
WOW...gorgeous and fun, fun creations!

Join in with us too,
as always, there is a fabulous prize to be won!

Entering these fun challenges:
Shopping Our Stash .... Farm Animals (w)
Cuttlebug Mania .... Dies (917)

Tuesday, September 6, 2016

Candy Apple

Hi There!
How was your weekend?  Busy like mine?
My hubby spent most of his 3 days off in the hay field baling hay,
so I had some free time today and decided to have a bit of fun.

I loved the inspiration photo from Curtain Call as soon as I saw it.
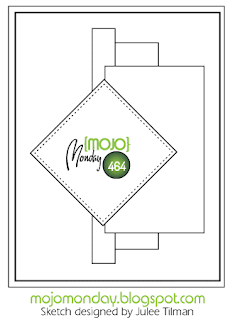
I also saw a fun sketch for Mojo Monday and decided to see if I could combine the two!


Here is my fun card


I have to admit, I am not the best at doing sketches,
but I keep trying.
I also have to admit that my shiny, shiny candy apple has
Crystal Effects on it to give it that nice candy apple look.
Well, it was suppose to have crystal effects,
but about two hours after I took the photos, I walked by and noticed
my apple was 'crackling'.  What the heck?
So I grabbed the bottle I used and whoops,
guess I put Ranger Crackle Accents on it instead of the Crystal Effects..LOL!


All the papers I used were from the scrap bin.
I don't think I will ever run out of scrap!

I also had to add the perfect little chipboard accent piece.
The stamp is from Unity, which I stamped, then fussy cut both the apple and the stem.
The embossed square is a Memory Box Stitched square die.
The background embossing folder is Elizabeth Craft Design.

If interested in playing along,
the links are below.

Entering the following challenges:
Curtain Call .... Candy Apple (x)
Mojo Monday .... Sketch (x)
Cuttlebug Mania  .... ATG/Die Cut (9/17)
Crafty Cardmakers .... Layers (x)

Monday, September 5, 2016

Autumn Greetings

We had a FUN and EASY
assignment at The Cutting Cafe using 

I had recently purchased some very bright card stocks
that are a lighter weight, making them perfect to run 
through my printer and perfect color for  the cards I created.

The two cards I am showing you today print on one sheet of
8 1/2 x 11 card stock.

I love how beautifully they print and what a perfect size they are!


For the first card, I cut it so I had a nice even edge around it
leaving my black card stock base showing.
I know you can;t see it, but I took a metallic gold
gelly roll pen and outlined over the black printed lines
giving it a bit of sparkle.

A few greens were die cut and I added some flowers
and a few sequin flowers to finish.
I loved the sentiment on this one as the card certainly is 'bright'..lol!


The second card I pretty much did the same thing,
except I used the same gelly pen to outline the sentiment as well.

I used an old stamp (2002) I had
and Sparkle N Sprinkle Copper Mountain embossing powder
for my image.
If you could see this IRL, you would see all the sparkle on it.

I finished it off by simply using a scrap of ribbon from RRR
and a wood heart button.

Mark your calenders as on the 7th of September you will need to visit 
The Cutting Cafe blog and see what my teammates have created
we will all have all our projects in one place for your convenience
AND
leave a comment there for your chance to win 3 cut files of your choice

Entering the following challenges:
Come and Get It .... Flowers (x)
Hiding In My Craft Room .... Fall Colors (x)
Crafty Catz .... ATG Twist:  Autumn Colors (w)
Really Reasonable Ribbon .... Autumn Colors/Ribbon (x)

Sunday, September 4, 2016

Halloween Cat

This is my post today on the

Happy Sunday to you!
I have a  fun card to share with you I created with the new
stamp set 'Halloween Cat'.
Halloween Cat
I had an idea for this stamp as soon as I saw it
and hoped it would work...it DID...let me tell how fun and easy
the background moon is to create.
Halloween Cat
I first used a Mini Mister of water and sprayed it on
regular heavy 100# card stock.
I sprinkled Nuance Orange and Bright Yellow
just by tapping the bottom side of the jar .
( I have little holes in each lid that I keep a push in for no spills...
simply easy to remove when I need to use it).
I added more water and more Nuance until I was satisfied with the colors
You can tip your paper to move the colors around,
just be careful not to 'muddy' them together.
Set aside to dry completely or use your heat gun as I did.
Halloween Cat
Next is where my creative idea came in to play.
I asked myself if I could emboss over the Nuance
and that is what I did.
Once your paper is completely dry use your 
Static Free Pouch to go over your paper
(this eliminates any embossing powder sticking where you don't want it)
 Ink up your stamp with Versmark
and stamp right over the Nuance colored paper.
Cover with Midnight Madness Embossing Powder,
then heat set.
I then used a circle die to cut out my background moon...
pretty colors aren't they?
Halloween Cat
I set that aside and die cut a fence.
I coated the fence with Nuvo Glue Pen (large)
then added Lacy Lilac Glitter.
I next punched out a few bats and once again used the Nuvo Glue Pen
then sprinkled on Black Ice Glitter.
Halloween Cat
I also punched out a few pumpkins, added the Nuvo Glue Pen,
then coated with Energized Orange Glitter.
Halloween Cat
The sentiment was stamped in Versamark on a scrap piece
of the left over Nuance paper I created,
then embossed with Midnight Madness embossing powder.
I cut it to look like a sign and hung it on the fence.

Halloween Cat
The backgorund paper is onyx cordinations, embossed with a Sizzix 
embossing folder, then sanded.  I used a distress tool around the edges
for a more 'spooky' look.
Halloween Cat
I hope you enjoyed today's tutorial!
Thank you for visiting with me today!
Diane

Entering the following fun challenges:
Creative Knockouts .... Sparkle and Shine (w)
Virginia's  View Challenge #23 .... Spray, Mist and Splatter (x)

Saturday, September 3, 2016

Sketch Saturday

I decided to have a bit of 'me' time this morning and do this
fun sketch challenge at 
'Sketch Saturday'.


I used a couple of scrap papers for my background
and stitched a crazy zigzag stitch around each panel.


I cut a couple stitched circles out from Memory Box using paper from Doodlebug.
It's the cutest little fall pack of paper!

I grabbed a couple of never used before
Spellbinders dies for the band at the bottom and the cute owl.

I finished off with some leaves and stamped my sentiment
in Versamark and used Sparkle N Sprinkle Copper Mountain
embossing powder.  I love that stuff, it has a bit of
copper glitter in it and it does sparkle...a lot!
I find embossing powders to be a bit 'magical'
I just love seeing them come to life.....
I know it takes a little longer to complete a sentiment,
but so well worth it!

Have a wonderful and safe Labor Day weekend!!

Entering the following challenges:
Crafty Hazelnuts Patterned Paper (m)
Sketch Saturday (w)
Hiding In My Craft Room .... Fall Colors (x)
NBUS .... Never Before Used Stuff (x)

Thursday, September 1, 2016

Friends Are Flowers

This is my post on the Tutti Designs blog today!

Today is an exciting day as I get to share with you a newly
released die called


Here is my card using the newly released die:


I cut my wreath in a shimmery paper
in somewhat fall colors.
I know the name of the die is 'summery wreath',
but it just goes to show you how these dies 
can be used for most any season!


I used glue here and there to attach the wreath to an ivory
card stock,
not gluing down the entire wreath so I was able to
'lift' it up in places for a more 3D look.

A sentiment was stamped inside the wreath
and a pretty sheer bow was added to finish.

Make sure and visit all the other inspiring places to see the
new Tutti Designs dies:


Thank you for visiting with me today!
'I' will be here each and every Thursday.
Come back tomorrow for more fabulous inspiration!

Diane

Entering the following fun challenges:
Word Art Wednesday .... ATG (w)