Friday, August 31, 2018

Fall Leaves

I have a little bit of fun and exciting news to share.
I have joined the Alphabet Challenge
and will be on Team A.
I know, I know I really need more work right?
But this is FUN work and not work at all to me,
it is very relaxing to sit and create,
plus we have long~cold winters here in Michigan
and if 'pacify's' me thru the winter months!!
Also what a lot of great designers I get to 'meet' and work with!

My first card I have made is for the letter "L" 
which the theme chosen is 'LEAVES'.


I went with a very simple card using a Spellbinders die
for the backgrounds.  The branch is actually part of a 
Cheery Lynn Designs Tree die, that I just snipped apart.
I die cut a few Impression Obsession
Maple leaves from snippets of my paper scraps.

The sentiment is from JustRite Shabby Chic Autumn Leaves set.  The acorn paper is from DCWV Harvest House.
I added a little wax cord bow.

My biggest struggle was trying to figure
out if I wanted to use stamps or dies and which ones lol...
I guess I have too much to work with!!

I would love to have you visit and join in our
leaves challenge with us...see you there!

Thursday, August 30, 2018

Christmas Bell

Just a little 4" square Christmas card to share with you today.
Gosh, it sure is 'prettier' in real life!


I used a scrap of Martha Stewart Christmas paper for the background
and a pretty metallic paper for the Candle Bell (can you see the candle image in it)?
A few sequins were added...that's it, very simple
but like I said above IRL it really is soft and pretty!
Entering the following fun challenges:
Merry Little Christmas .... ATG Christmas
Rudolph Days .... ATG Christmas

Wednesday, August 29, 2018

Monkey'n Around

This is my card on the Cheapo Dies
blog today.

Hi, Diane filling in again today with a super, quick and easy card
just about perfect for a little one!


I used the Cheapo Dies MONKEY for my 'main attraction'.
I die cut him from brown linen paper and added him to a scalloped polka dot circle.
The background paper is some I have had forever.
The banana button I received as a 'gift
 a long while back..silly and cute little thing!


I thought he was just 'begging' for google eyes and big ones at that!

Visit the Cheapo Dies online store as there are LOTS of new dies just in!!
Come back tomorrow for more fabulous inspiration using these dies!!

Tuesday, August 28, 2018

Pretty Fall Flourish

This is my post on the Tutti Designs BLOG today.

Hard to believe that summer is starting to wind down
and Fall will soon be upon us isn't it?
Well, Diane here with you today to get a bit of an early start on fall cards.

I have three cards today using the pretty and delicate

For the first card I embossed a plum card stock for the background,
then added my fall flourish die, cut from a scrap of designer paper,
added a hemp bow and a banner sentiment.


The second card I layered a few rectangle die cuts,
then cut the fall flourish from a patterned designer paper
and added a pretty bow. 
I think all the layers really sets off the fall flourish die!


For the last card, I used a textured paper,
then die cut a Stitched Oval using the Nesting Stitched Oval die set.
Once again, I die cut the Leaf Flourish from a patterned paper,
added a strip of burlap ribbon, a burlap flower and a few sequins.


No automatic alt text available.


No automatic alt text available.

I hope I have inspired YOU to create some fall cards.....
I will be back next Tuesday with a bit more 'fall inspiration!

Visit here daily for fabulous inspiration on how to use your Tutti dies!!


And here are some Tutti Designs quick links:


Thank you for visiting with me today!

Entering the following challenges:
Dream Valley .... Autumn Colors

Sunday, August 26, 2018

So Grateful

This is my blog post on the Sparkle N Sprinkle blog today.

Hi All!
Today I have a very soft and somewhat 'dainty' card to share with you 
using the new stamp set Feathered Friends 909P5.


Supply List:


To start my card, I simply stamped the image on a die cut circle of vellum
and embossed with White Embossing Powder EP166.

After embossing, you simply flip the  image over

and start coloring on the backside.


Here is the image (right side up) completely colored.


Once colored I cut a larger circle  then my stamped image from Sticker Paper 99558
and adhered it down.  I sprinkled  Peach Bellini Glitter GM2027 all over
and used my Glitter Brush SG1400 to brush away all the excess glitter.


I added a pretty designer paper, then covered it with vellum
and adhered all pieces with 1/2" Double SidedTear-ific Tape ½” SAT04.
A sentiment was stamped with 
and a few 'drops' were added with Nuvo  Crystal Drops Bubblegum Blush 672N
I finished with a pretty ribbon bow!


Thank you for visiting with me today!
Make sure to visit the Sparkle N Sprinkle store for all your papercrafting needs!!


Wednesday, August 22, 2018

Bloomin' Flowers

Bloomin' Flowers is the theme for the next two weeks
at The Sisterhood of Crafters and is being hosted
by our lovely and talented 'sistah' Gwen.


As I have stated many times before, I love to be on the DT for these challenges
as it gives me an opportunity to use my much neglected and NBUS .

This stamp set is one of those..never used....
It is from Cottage Cutz Daisy.
You get not only the stamp but the matching die as well
and as of the writing of this, it is on sale  HERE.

I did just a simple and easy to mail card with some fun papers,
scalloped oval die and some Copics.


We would love to have you join us for our easy challenge at The Sisterhood
and be sure to stop by and see all the pretty 'blooms' my 'sistah's have created!!

Aperture Card

Today begins a new challenge at
The challenge is to make an 'aperture' card.
Not sure what that is?
Here is a definition of it:
Aperture:  an opening, hole, or gap.

You can also bring up You Tube or Pinterest  for inspiration and tutorials.
But, speaking of inspiration,
the Design Team has plenty of that for you!

My card is pretty simple.
A linen embossed panel with a 'hole' in it.


I used a Tonic stamp set 'Bunched Bouquet,
stamped with Dew Drop inks Grape Jelly and Lulu Lavender.
A few gems were added for sparkle.


Ma sure to pop on over to the Back To Basics and Beyond to see
what lovely creations my team mates have in store for you!!

Tuesday, August 21, 2018

Fall Rosette

Hello 'Pumpkins'!

I have a very 'fall-ish' card today using the file from

I went BIG with my Rosette and it fits an entire 5" square card!


I used a few scrap papers for the background and embossing folder that very much
resembled the pattern on the Rosette.


I die cut a leaf and added a hemp bow to it...EASY!!

Visit The Cutting Cafe blog this afternoon to see all the variations of colors,
designs and sizes the entire Design Team has created just to inspire YOU!


Happy Birthday To You

I am filling in again on the
Cheapo Dies blog again today....!

Hi there, I hope you are having a 'whale' of a good Tuesday!
Speaking of  'whales', I have the cutest little 'whale' card ever!


I die cut my whale from a fun polka dot paper
(whales can have polka dots, right?)
then adhered him down on black card stock which
I fussy cut around (easy)!


I added a few 'bubbles' using sequins,
then stamped my sentiment.

An easy but cute card, perfect to pop in the mail for a birthday!


Thank you for visiting with me today!

Pretty Acorn Frame

This is my post on the
Tutti Designs blog today using a beautiful 'Fall' die

I have three variations of cards using the frame,
showing how versatile this die is.

The first card I cut a Stitched Rectangle from the
Tutti Designs Nesting Stitched Rectangle set from white card stock.
The acorn frame die itself was cut from a scrap of pretty designer paper.
A sentiment was stamped in the center, and a hemp bow added.


The second card I used a linen texture paper,
 a punch to 'round' the corners,
then die cut the acorn frame once again from a scrap of designer paper.
A piece of jewelry cord was made into a bow
and I added a banner sentiment across the wreath.


The third card I simply used a designer paper for the background,
die cut the acorn frame from a glitter paper,
added a hemp bow and a pretty fall flower.


All three cards were easily made and I hope I have given
you a few ideas using this beautiful die!


No automatic alt text available.


No automatic alt text available.

Visit here daily for fabulous inspiration on how to use your Tutti dies!!


And here are some Tutti Designs quick links:


Thank you for visiting with me today!

Sunday, August 19, 2018

Birds of A Feather

I am on the Sparkle N Sprinkle blog today featuring
a new stamp set 'Feathered Friends'!

Come Fly Away With Me!


Hi peeps , Designer Diane with you today with a fun card
that is very easy to create featuring the new stamp set

SNS Supply List:

Stamps:  Feathered Friends 909P5
Glitter:  Blue Lightning G1008
Embossing Powder: Firecracker Blue
Other:  Glitter Brush SG1400
Tonic:  Splayed Feathers Stencil 1480E

A bird cage was die cut using a TH Sizzix die.
Now I have to admit I made a mistake with this
that turned out FABULOUS!

I had both my Blue Lightning glitter 
and
 my  Firecracker Blue embossing powder
sitting on my table next to each other.
After applying Glue Pen LG all over the die cut
I grabbed what I thought was the  Blue Lightning glitter...
but instead I had grabbed the Firecracker Blue embossing powder.
It was a little too late to change so I just went with it
and embossed right over the glue and LOVED the results!
After all, the   Firecracker Blue embossing powder has glitter in it!


I set the die cut aside and then stenciled a background using a
blending the mouse in with Nuvo Blending Sponges
(yes it shows orange on one end left over from a previous project)


I pulled the stencil off and  lined it up on the opposite side,
then stenciled that.


Using Feathered Friends stamp set, I colored the birds with Copics,
stamped the sentiment with  Diamond Hybrid Ink Sea Siren,
then fussy cut both out...easy!
I also added a bit of shimmer to the birds using an

Tear-ific Tape ¼" was added to the four outside edges of my card stock,
then sprinkled with Blue Lightning glitter.
One of my favorite 'tools'  the Glitter Brush  was used
to brush away all the excess glitter.


Beneath the entire finished panel I added even MORE shimmer using
To complete my card a feather, flower and ribbon were added!


Thank you for visiting with me today and make sure and visit
 for all your card making needs!

Wednesday, August 15, 2018

Celebrate

Already the middle of August and that means it's time
for a new challenge theme at the
The challenge theme is 
'You Are A Star'.


I started with a white card stock that I embossed with a star embossing folder.
I used Lawn Fawn Stitched Hillside Borders to give it a nice 'curvey'
design at the bottom.
 (these dies can be used for more then just hillsides).

Before adhering it down I tucked a piece of
polka dot designer paper under it using
I added a Tutti Designs Word Set Celebrate  to that,
which I cut in both white and pink,
stacking for a 'shadow effect'.


The 'STAR' of the show (pun intended) is
cut once from a pink card stock and once from a glitter paper.
I had some little star 'candis' in my stash and thought they
would be cute to add.


Here is a recap of all the products used.

Now pop on over to the Dies R Us challenge blog and see
all the fabulous inspiration waiting for you there
asdmy teammates have once again outdone themselves!

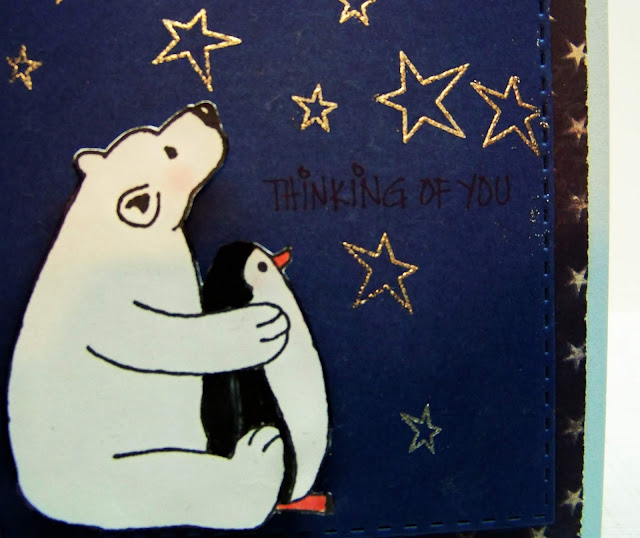
Thinking of You

A new challenge at Double D starts today
and a new mood board:
The Moon or The Stars


There certainly is a LOT of inspiration there,
I went with the bottom right corner (minus the moon lol).

I think this is the cutest stamp set from Penny Black Star Gazing Friends.


I stamped the stars in Versamark on navy card stock,
then embossed with SNS Gold Detail embossing powder,
added a couple little confetti stars as well.


The sentiment I know, barely shows in the picture, but it does IRL as they say.

So I encourage you to pop on over  to the Double D blog
and see all that the Design Teams have
created, they always, always do an amazing job!!